- Published on ·
- Reading time 14 min read
Smashing Out a Build and Deploy Pipeline Using TeamCity
React JS + Azure Storage and CLI + Lots of TeamCity GUI
Share this page

Introduction
Learning TeamCity can be challenging so I'd recommend learning the UI before moving into Kotlin, which is a programmatic way to create the TeamCity pipeline. This article demonstrates the use of the TeamCity user interface to create a build and deployment pipeline to build a React website and deploy it to an Azure blob storage account.
Prerequisites
React website code on GitHub
You'll need a sample React app if you're following along. Feel free to fork this GitHub repository or create your very own React app in a GitHub repository.
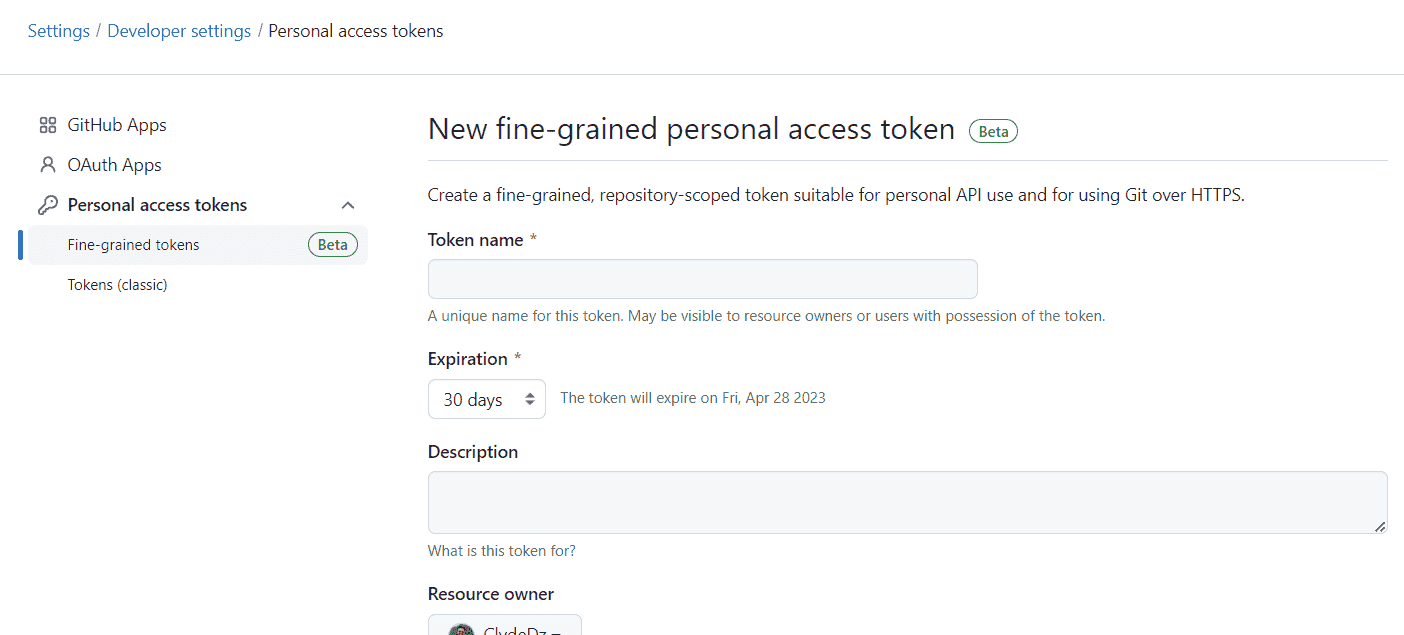
You may also need to create a personal access token in GitHub and have that value handy so that your TeamCity pipeline can connect to the GitHub repository if your GitHub repository isn't accessible without a password. Head over to the personal access tokens page on GitHub, fill up the metadata, select a repository that you want to link with this token, and then finally, under the Repository permissions section, select Read and write permissions for Commit statuses and Contents. You can always fine-tune this later.
Azure configurations
If you're following along, you may need an Azure account to be able to deploy the React website to Azure blob storage. Once you have that sorted, you can jump back into the command line to take it away from there.
Let's install the Azure CLI on your computer so that you can run some Azure commands. Follow these steps to install the CLI on your Windows, Mac, or Linux device.
Next, run az login to log in to your Azure account from your CLI. You'll now need the subscription ID, so run az account list to get a list of subscriptions for the logged-in account and copy the active subscription ID.
A resource group is like a container that holds various Azure resources. We'll need to create one to hold our storage account by using the command az group create -l westus -n <RESOURCE GROUP NAME> --subscription <SUBSCRIPTION ID>. Replace <SUBSCRIPTION ID> with the ID you copied earlier and <RESOURCE GROUP NAME> with a suitable name of your choice.
We'll now go ahead and create the storage account using the command az storage account create -n <STORAGE ACCOUNT NAME> -g <RESOURCE GROUP NAME> -l westus --sku Standard_LRS. Replace <STORAGE ACCOUNT NAME> with a suitable name and <RESOURCE GROUP NAME> with the resource group name from above. We'll also need to update the storage account configuration slightly to get the storage account to serve a website and also set the error page and starting index page using the command az storage blob service-properties update --account-name <STORAGE ACCOUNT NAME> --static-website true --404-document error.html --index-document index.html.
Finally, we'll need to create a service principal which will allow us to use credentials to log in to the Azure account from the TeamCity pipeline later. We'll run this command az ad sp create-for-rbac --name “<SERVICE PRINCIPAL NAME>” --sdk-auth --role “Storage Blob Data Contributor” --scopes /subscriptions/<SUBSCRIPTION ID>/resourceGroups/<RESOURCE GROUP NAME> and replace <SERVICE PRINCIPAL NAME> with a suitable name, <SUBSCRIPTION ID> with the subscription ID copied from before and <RESOURCE GROUP NAME> with the resource group name created before.
Running the command will return the credentials. Save the clientId, clientSecret and tenantId which we'll save for future use.
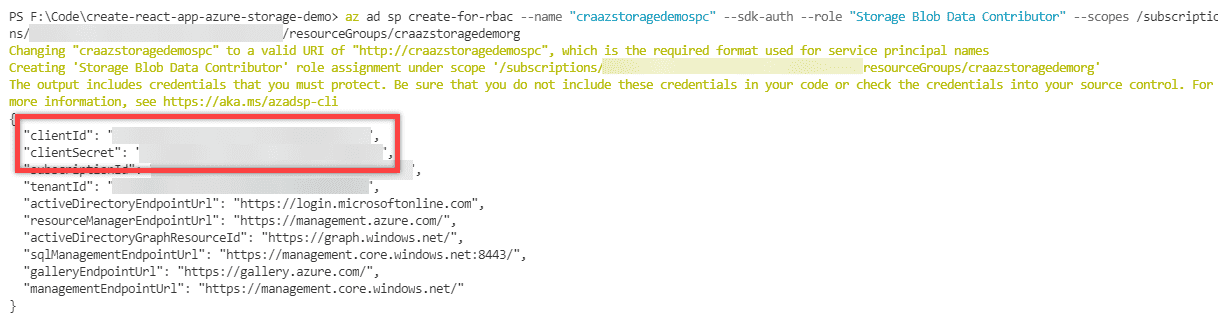
If you need the tenant name, you can get that straightaway from the URL. It'll be in the format @example.onmicrosoft.com.

TeamCity deep-dive
Creating a new project
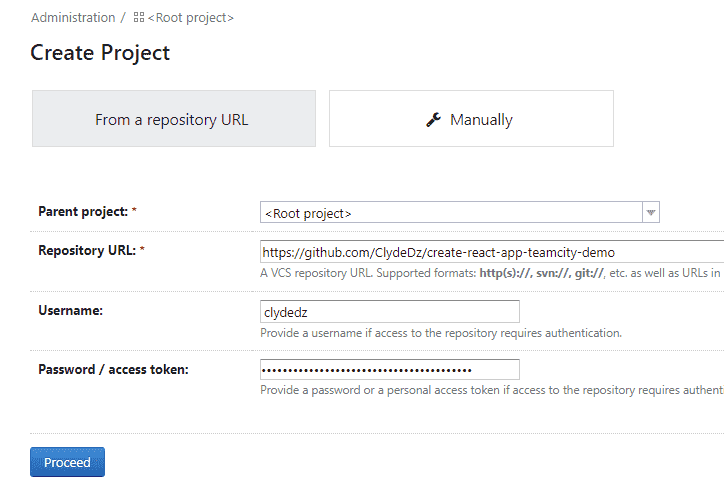
Head over to the Projects navigation tab in TeamCity and click on the New project button located on the top-right of the screen.

In the Create Project screen, enter the required details in the respective fields. Usually, you would create a project under the root project. However, if hierarchically organized, it makes sense to place this project under another existing project and select a different one from the Parent project dropdown. Here, the Password/access token is the personal access token you would've created earlier. If it's a public repository, you may not require a password/access token. Click on the Proceed button once everything has been entered.
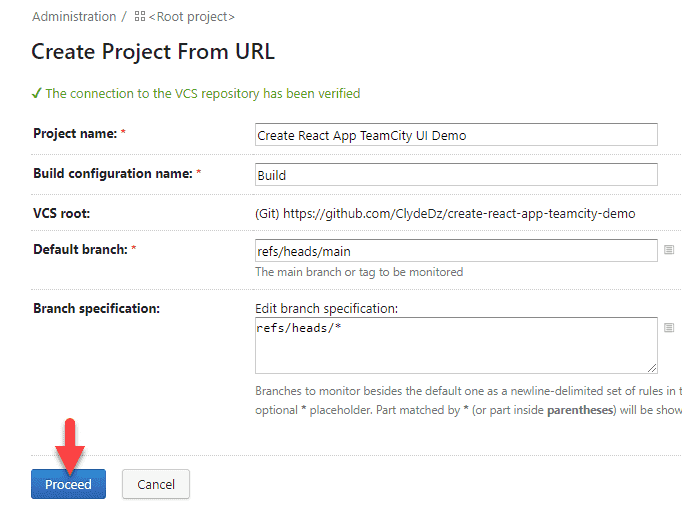
If the connection to GitHub was successful, you'll see a success message with a few other fields to configure the branch specifications. We'll leave this as the default for now and click on the Proceed button.
Build configuration
Now that we've created a project, we'll need to configure the actual steps that will run once our pipeline is triggered. These steps will be responsible for building our application and then deploying it.
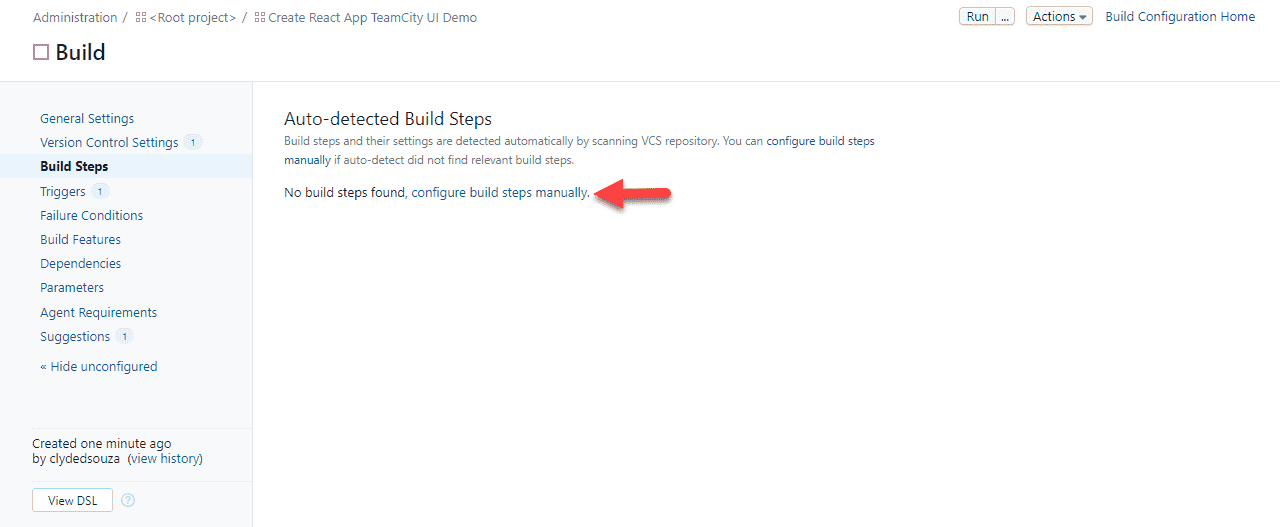
Click on the configure build steps manually link from the Build Steps page.
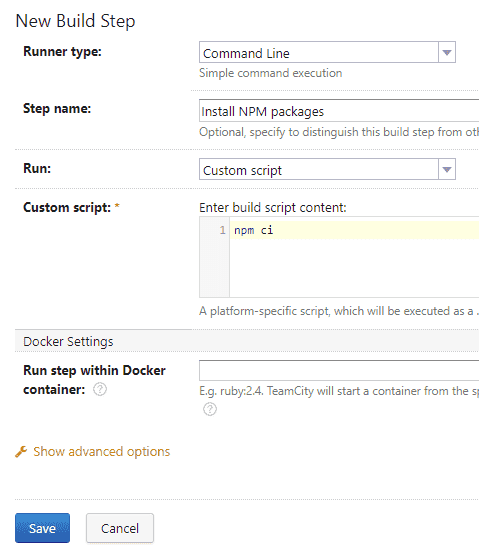
Build step #1: Install packages
We want to first install the required npm packages for the project, similar to what you'd do when you first clone a project on your machine. We've selected the Runner type to be Command Line so that we can write the commands ourselves.
In the Custom script section, we'll enter npm ci. Running this command should install the required npm packages. In the Step name field, you can provide a descriptive name for this step as this text is what will appear in the UI later. Finally, click on the Save button to save this step.
Similarly, let's add two more build steps.
Build step #2: Build the project
Follow the same process as above but this time, write the command npm run build. This will build the project and generate the output files. These output files are what need to be deployed for the website to be running, which we'll do very soon.
Build step #3: Run tests
Repeat the steps again to add another command line build step and this time, write the command set CI=true&&npm test. We want to ensure that we run all the unit tests that are written as part of our project so that the quality of our website is maintained. We're prefixing the command CI=true so that the tests don't default to run in watch mode.
Build settings
Now that we have the required three steps, let's go to the General Settings page and set the Artifact paths to the build folder. This is because the npm run build step configured above generates the output files in the build folder and we want our build configuration to expose the generated files as build artifacts so that the deployment configuration can use them ahead.
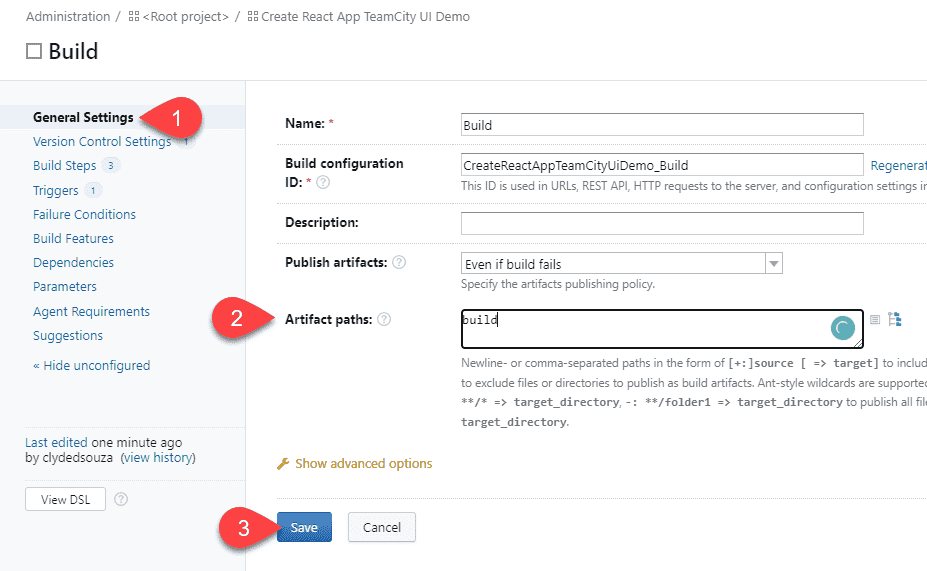
Click on the Save button and then click on the Run button to test the build configuration. This will execute all three build steps we configured above.

If you click into a build that's completed, and then click on the Build Log tab, you should see the logs generated from each build step and even the other entry and exit logs.
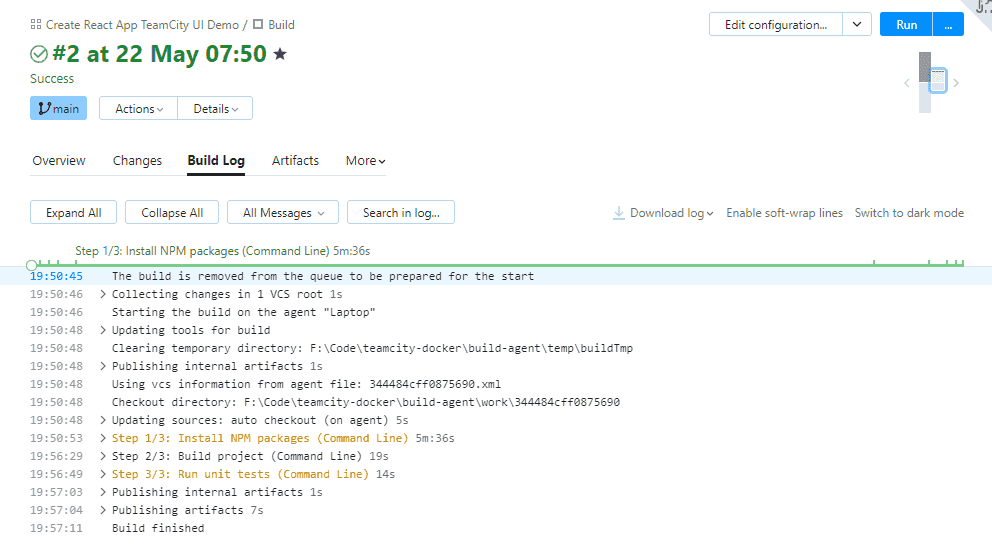
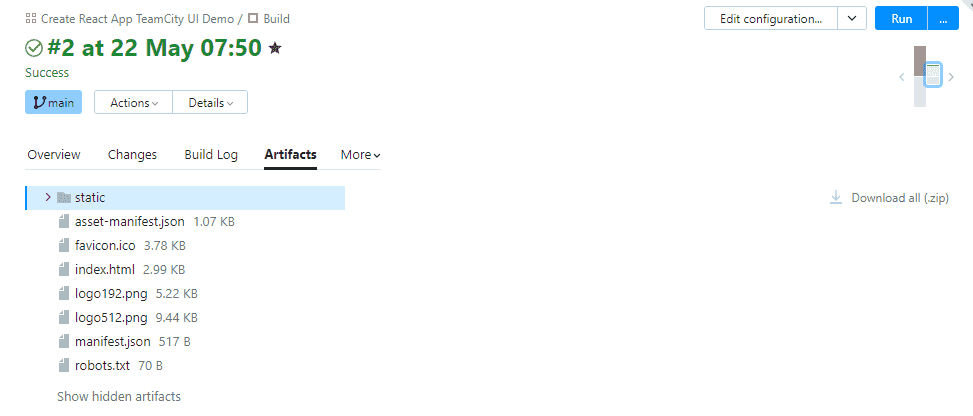
If you click on the Artifacts tab, you should see the generated website files. This confirms that our build configuration has run successfully.
Optimizing the build configuration
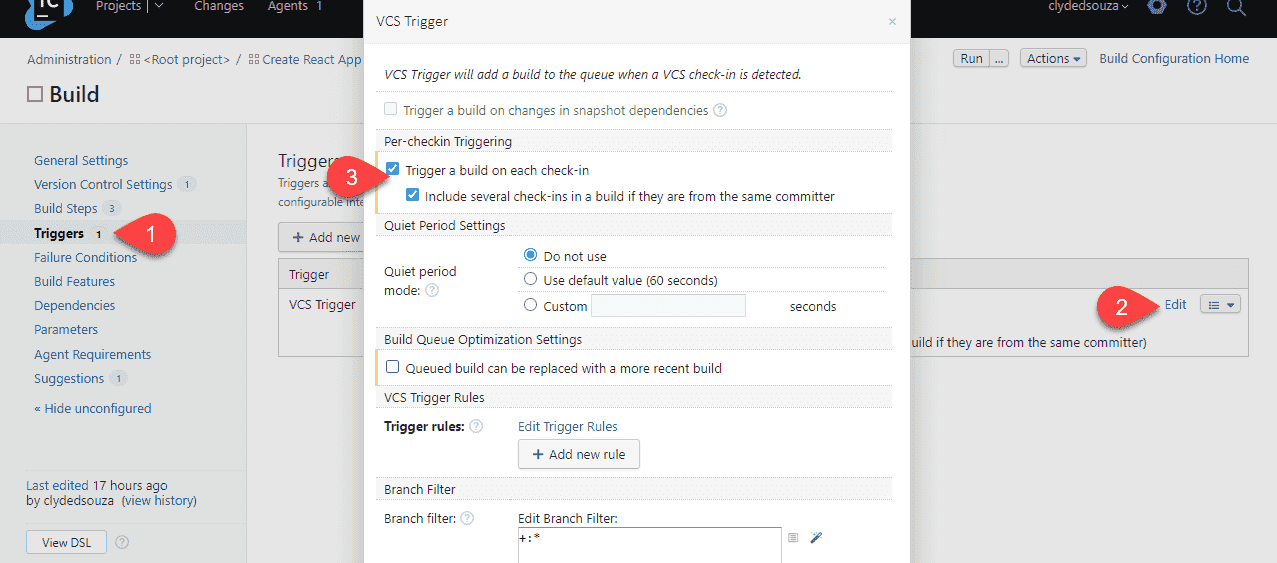
If we click on the Triggers page and then click on the Edit link against the VCS Trigger, we can configure Per-checkin Triggering or in other words, batch triggering. Let's say you push multiple check-ins to the remote branch, you may not want each of those commits to run a separate build. Instead, you'd want the last check-in to run the build configuration.
To enable this behavior, we'll check both boxes in the Per-checkin Triggering section and then click on Save.
Notifying GitHub
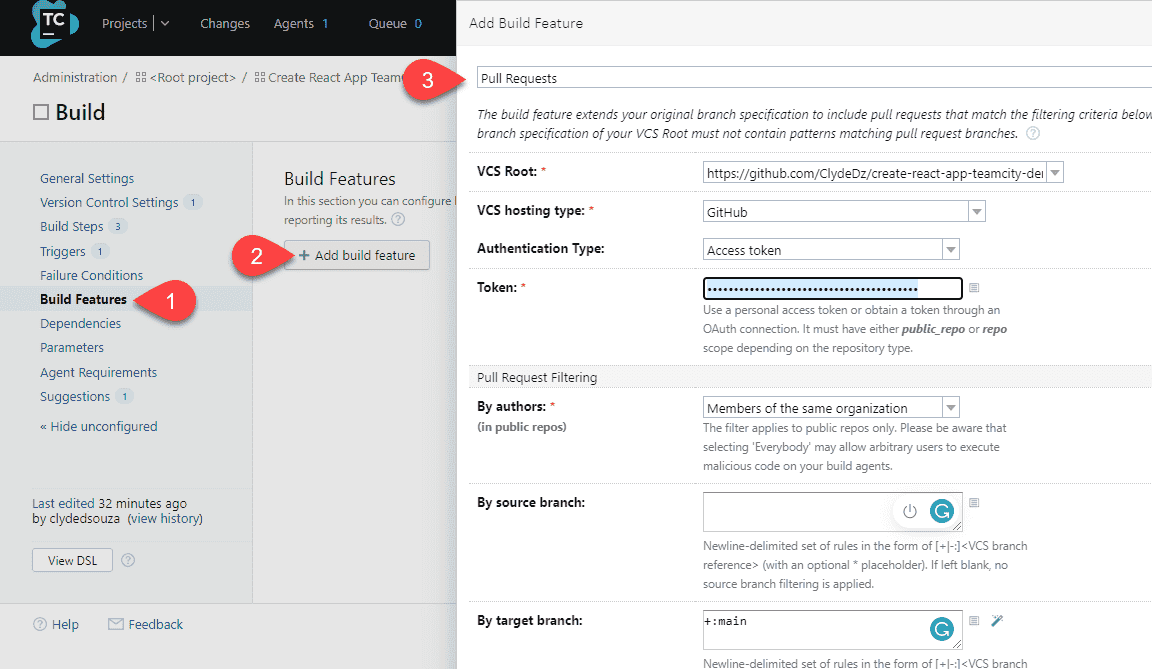
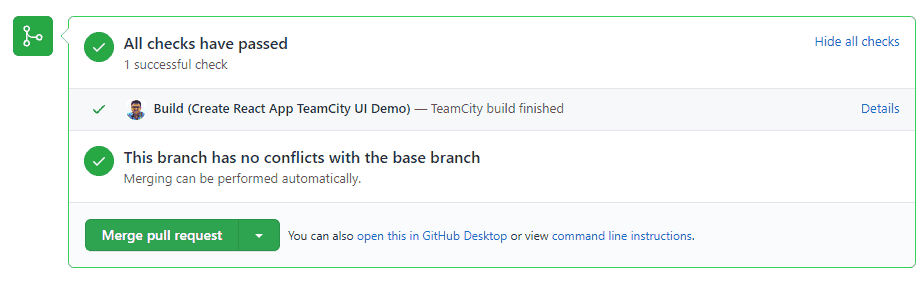
Next, we'll add a step so that TeamCity notifies GitHub of the outcome of the build configuration. Let's click on Build Features and then click on the Add build feature button. We'll configure TeamCity to update the pull requests in GitHub with the status of the build and also update the status against the commit that triggered the build.
In the modal that pops up, select the Pull Requests build feature from the dropdown. VCS Root will be the same GitHub repository we configured earlier so the access token will also be the same that needs to be entered here. Click on Save to save these changes.
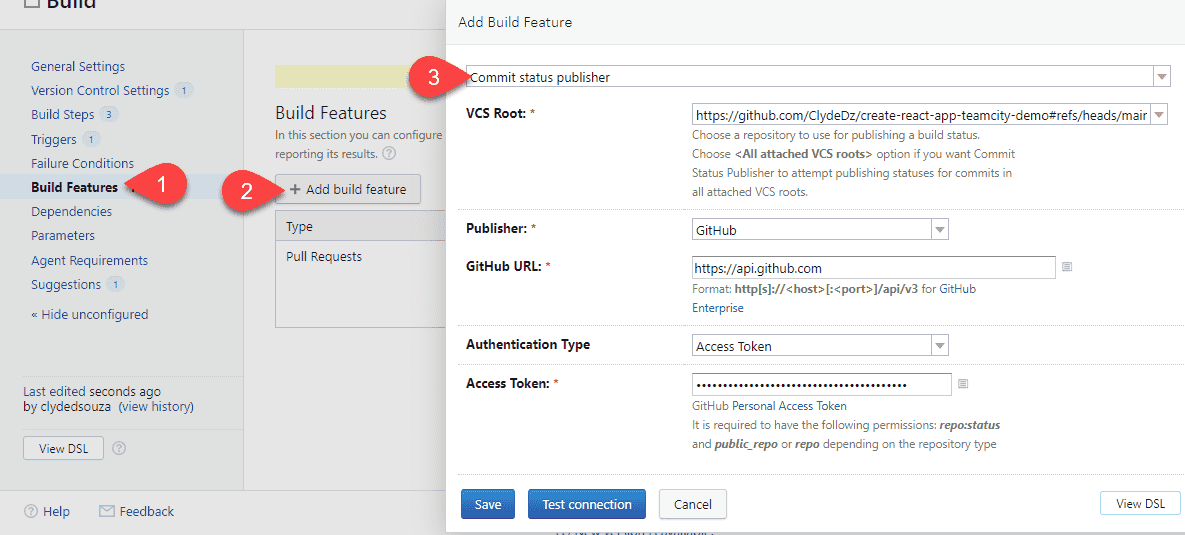
Similarly, repeat the steps but this time, select the Commit status publisher build feature, enter the access token, and then click on Save to add this configuration to the mix.
If you now run the build configuration once again by clicking on the Run button as we did earlier, and then upon a successful build, head over to GitHub, you should see an update from TeamCity in the pull request and also in the commit history.
Deployment configuration
Let's head back to TeamCity and click on the New build configuration button to add the deployment step.
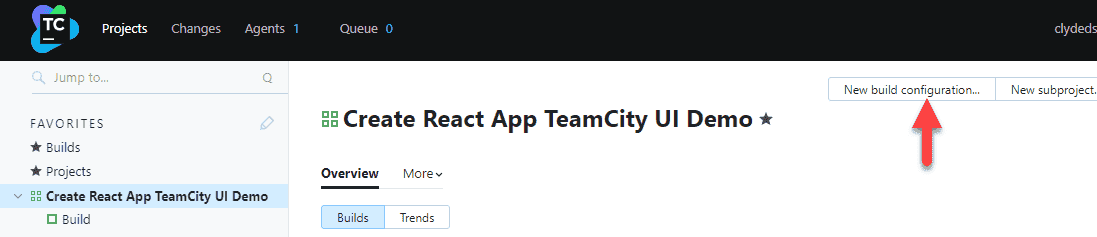
The build configuration page is quite similar to the one we did earlier and so are the values for the parent project, GitHub URL, GitHub username, and access token. The difference would be the Build configuration name which we'll set to Deploy.
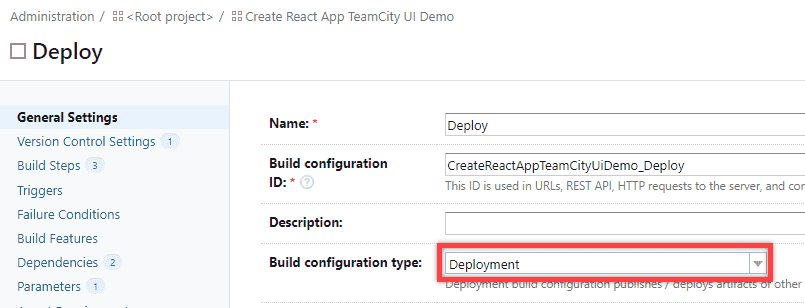
Deploy settings
From the General Settings page, we'll configure the Build configuration type to Deployment.
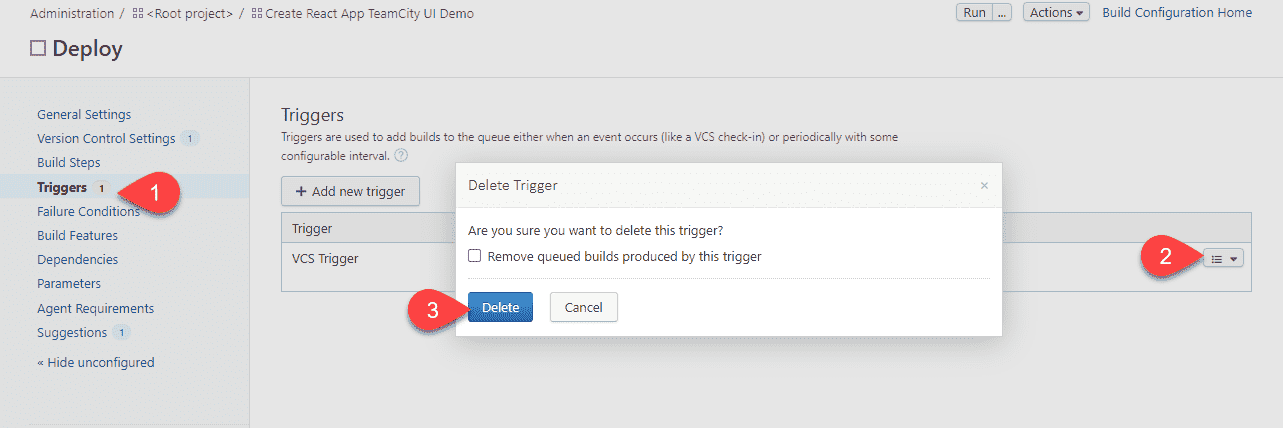
What triggers this deployment?
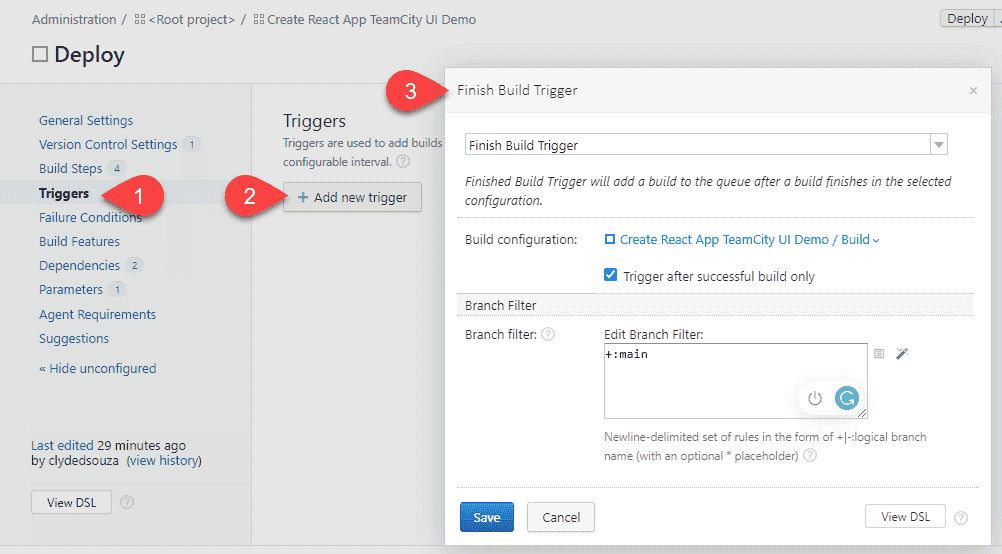
From the Triggers page, we'll delete the default VCS Trigger by clicking the dropdown beside it and then the Delete button from the popup. The reason is that we don't want a code check-in to trigger the deployment steps. Instead, we want a successful build to trigger it.
While still on the Triggers page, we'll click on the Add new trigger button, and then from the Finish Build Trigger modal, we'll ensure that the checkbox is checked to trigger the configuration after a successful build only and the dependent build configuration is selected as Build, which is what we configured and tested earlier in this article. We'll also leave the branch filters as-is to main. Click on the Save button to save these changes.
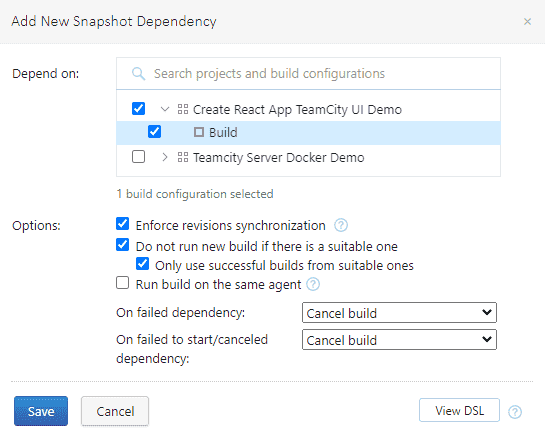
From the Dependencies page, let's click on the Add new snapshot dependency button.
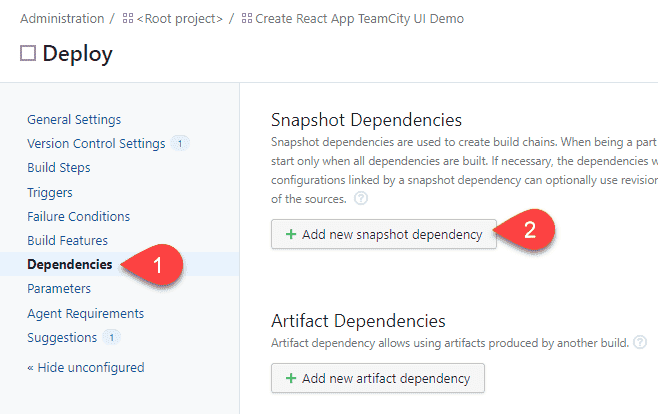
Our deploy configuration is dependent on the Build configuration, so let's select that. The remaining settings should already be defaulted to what you see in the screenshot below. Click on the Save button to save these changes.
Artifact dependency
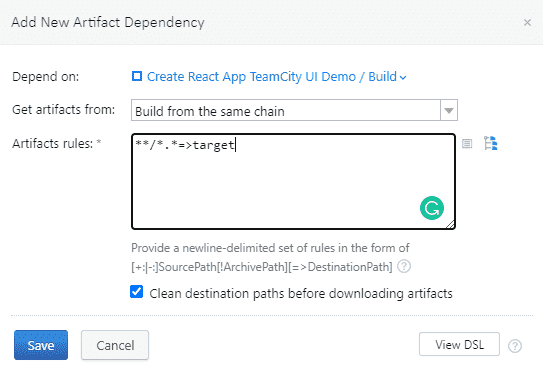
While still on the Dependencies page, click on the Add new artifact dependency button.
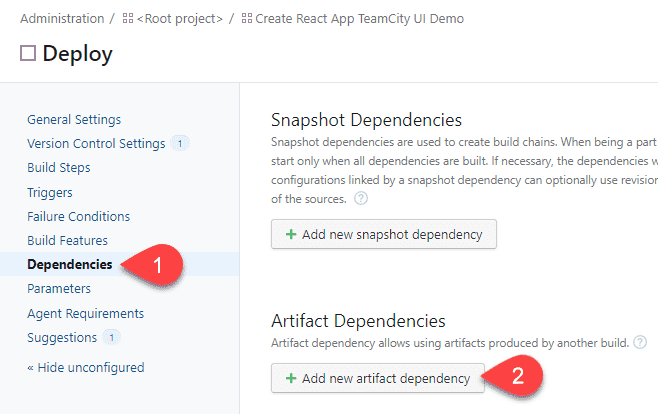
From the Add new artifact dependency modal, we'll ensure that we depend on the Build configuration, and in the Artifact rules textbox, we'll enter **/*.*=>target which translates to copying the files found in the artifacts folder of the build configuration into the target folder in our current deploy configuration. Checking the Clean destination paths before downloading artifacts checkbox ensures that no old files exist on file. Click on the Save button to save these changes.
Hold up! What's the difference between finish build trigger v/s snapshot dependency v/s artifact dependency?
Artifact dependency is just letting TeamCity know that build B needs artifacts from build A. It has nothing to do with how the build actually gets triggered.
If build B has a finish build trigger configured on build A, it means that after build A successfully runs, it will trigger build B. However, you can still trigger build B individually without triggering build A. This is great if you want to automate steps and not have manually trigger build B after build A has ran.
If build B has a snapshot dependency configured on build A, it means that build B will not automatically get triggered after build A runs. But, if you trigger build B, it will check to see if build A needs to run and if does, it will first run build A and then run build B. Snapshot dependency helps form a build chain, and this is particularly useful to manage deployable units and rollbacks. Therefore, if a previously run build B is triggered again, it maintains the association of the build chain and gets the deployable code from build A (if build A was responsible for building the code and producing the artifact and build B was responsible for deploying the code) and deploys that version of the codebase instead of getting the last (and possibly latest) version of the codebase from build A.
Secrets and variables
From the Parameters page, click on the Add new parameter button and then from the modal, let's type the parameter name as env.AZURE_CREDENTIALS and in the Value field, type the client secret we saved earlier. Click on Save.
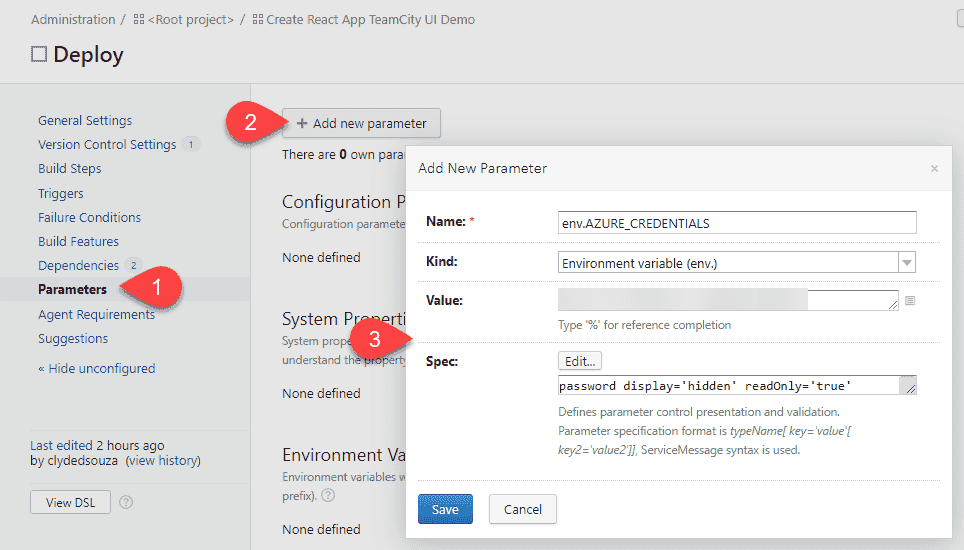
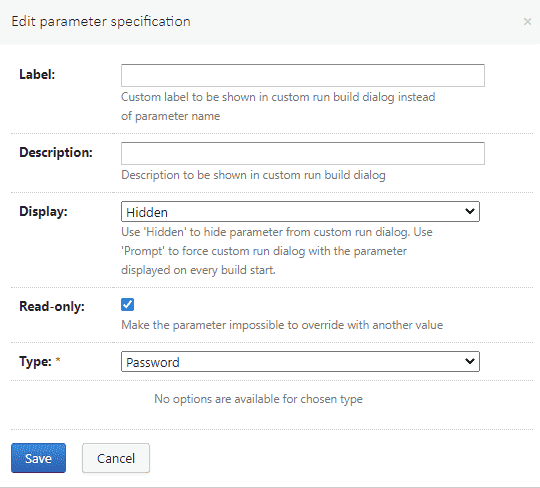
Since this is a secret password, we can click on the Edit button against the Spec field and ensure that the Type is set to Password and the Read-only checkbox is checked.
Build steps
Now it's time to add the actual steps that the deploy configuration will execute so that it can deploy the website. To do so, we'll need to add build steps. Yes, I know, it's called build steps even though it's for deployment, but that's just how TeamCity has named it!
Let's repeat the steps we did in the build configuration and add three command line build steps. We do this by clicking on the Build Steps page and then clicking the Add build step button.
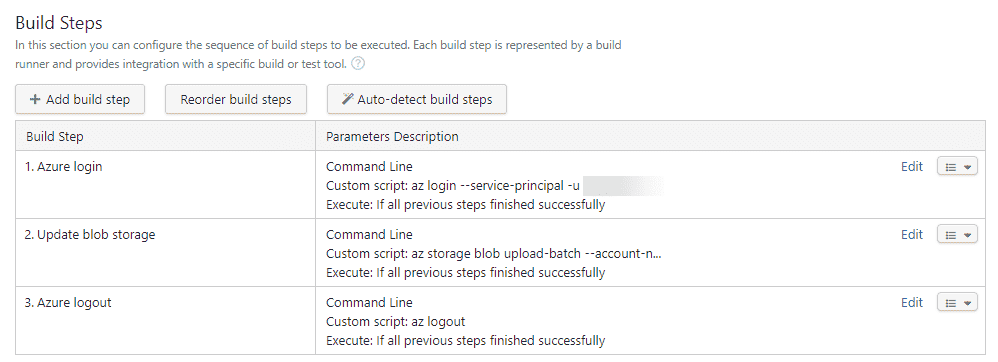
Deploy step #1: Log in to Azure
The first step is for the TeamCity build runner to log in to the Azure account. We'll supply the command az login --service-principal -u <SERVICE PRINCIPAL ID> -p %env.AZURE_CREDENTIALS% --tenant <TENANT NAME>. Replace <SERVICE PRINCIPAL ID> with the client ID we saved earlier and <TENANT NAME> with the Azure tenant name noted earlier in the command above. env.AZURE_CREDENTIALS will automatically get replaced with the secret configured previously.
Deploy step #2: Upload website files
We'll then batch-upload the website files into the blob storage account using the command az storage blob upload-batch --account-name <STORAGE ACCOUNT NAME> -d $web -s ./target --auth-mode login. Replace <STORAGE ACCOUNT NAME> with the actual storage account name created earlier.
Deploy step #3: Log out of Azure
Tidy up and log out of Azure using the command az logout.
Test it out
Click on the Deploy button to execute the deploy configuration.

You can have a look at the Build Log tab to see if the steps have been executed correctly.

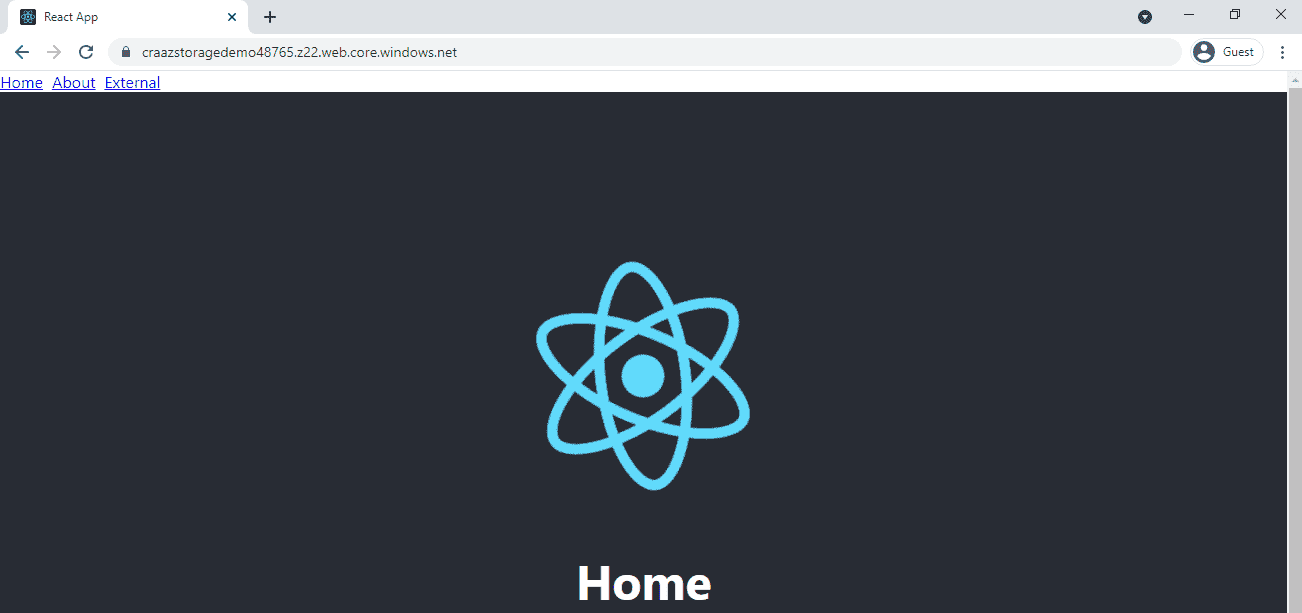
Once the deployment is complete, you can head over to the Azure storage account website URL to confirm that the website has been deployed successfully.
Viewing the build chain
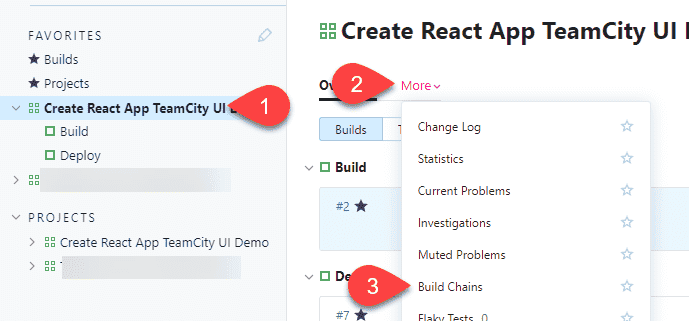
Back in TeamCity, if you click on the project name from the sidebar, then from More options if you click on Build Chains, TeamCity will redirect you to another page.
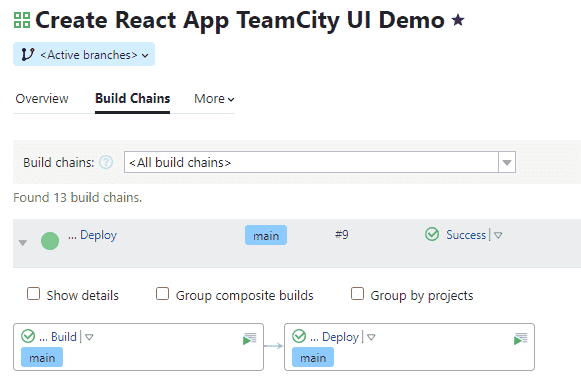
Here, you can visually see the two configurations chained together and once they're running, you'll be able to also visually see which steps they're at and if one configuration is waiting for the other. If you click on the green play button on each configuration tile, you'll be able to execute that step specifically. This is particularly useful in terms of a rollback if you need to execute a step again to redeploy a previously deployed version of the website. Finally, if something goes wrong, you'll also be able to see them turning red and be able to click on the step to investigate the issue.
Conclusion
As you might've observed, there are plenty of steps but they're mostly straightforward. The GUI is not very intuitive so some explanation is always needed before experimenting with something, so I'm hoping the above article will be useful for you. A parting tip would be to always have a test pipeline ready where you can experiment and learn and then once confident, you can apply the same changes in production.
That's it. Thanks for reading.