- Published on ·
- Reading time 12 min read
Build and Publish a Chrome Extension
Share your work with millions of users
Share this page
Introduction
Chrome extensions are programs you can install on your Chrome browser to customize your Chrome browsing experience. In the recent past, I've created a few Chrome extensions and this has allowed me to experiment with different types of extensions and learn the process of building and publishing them first-hand, and I must admit, the process is much simpler than I'd imagine it to be. In this article, we're going to take a look at developing a Chrome extension and also publishing the extension to the Chrome Web Store for others to use.
High-level architecture
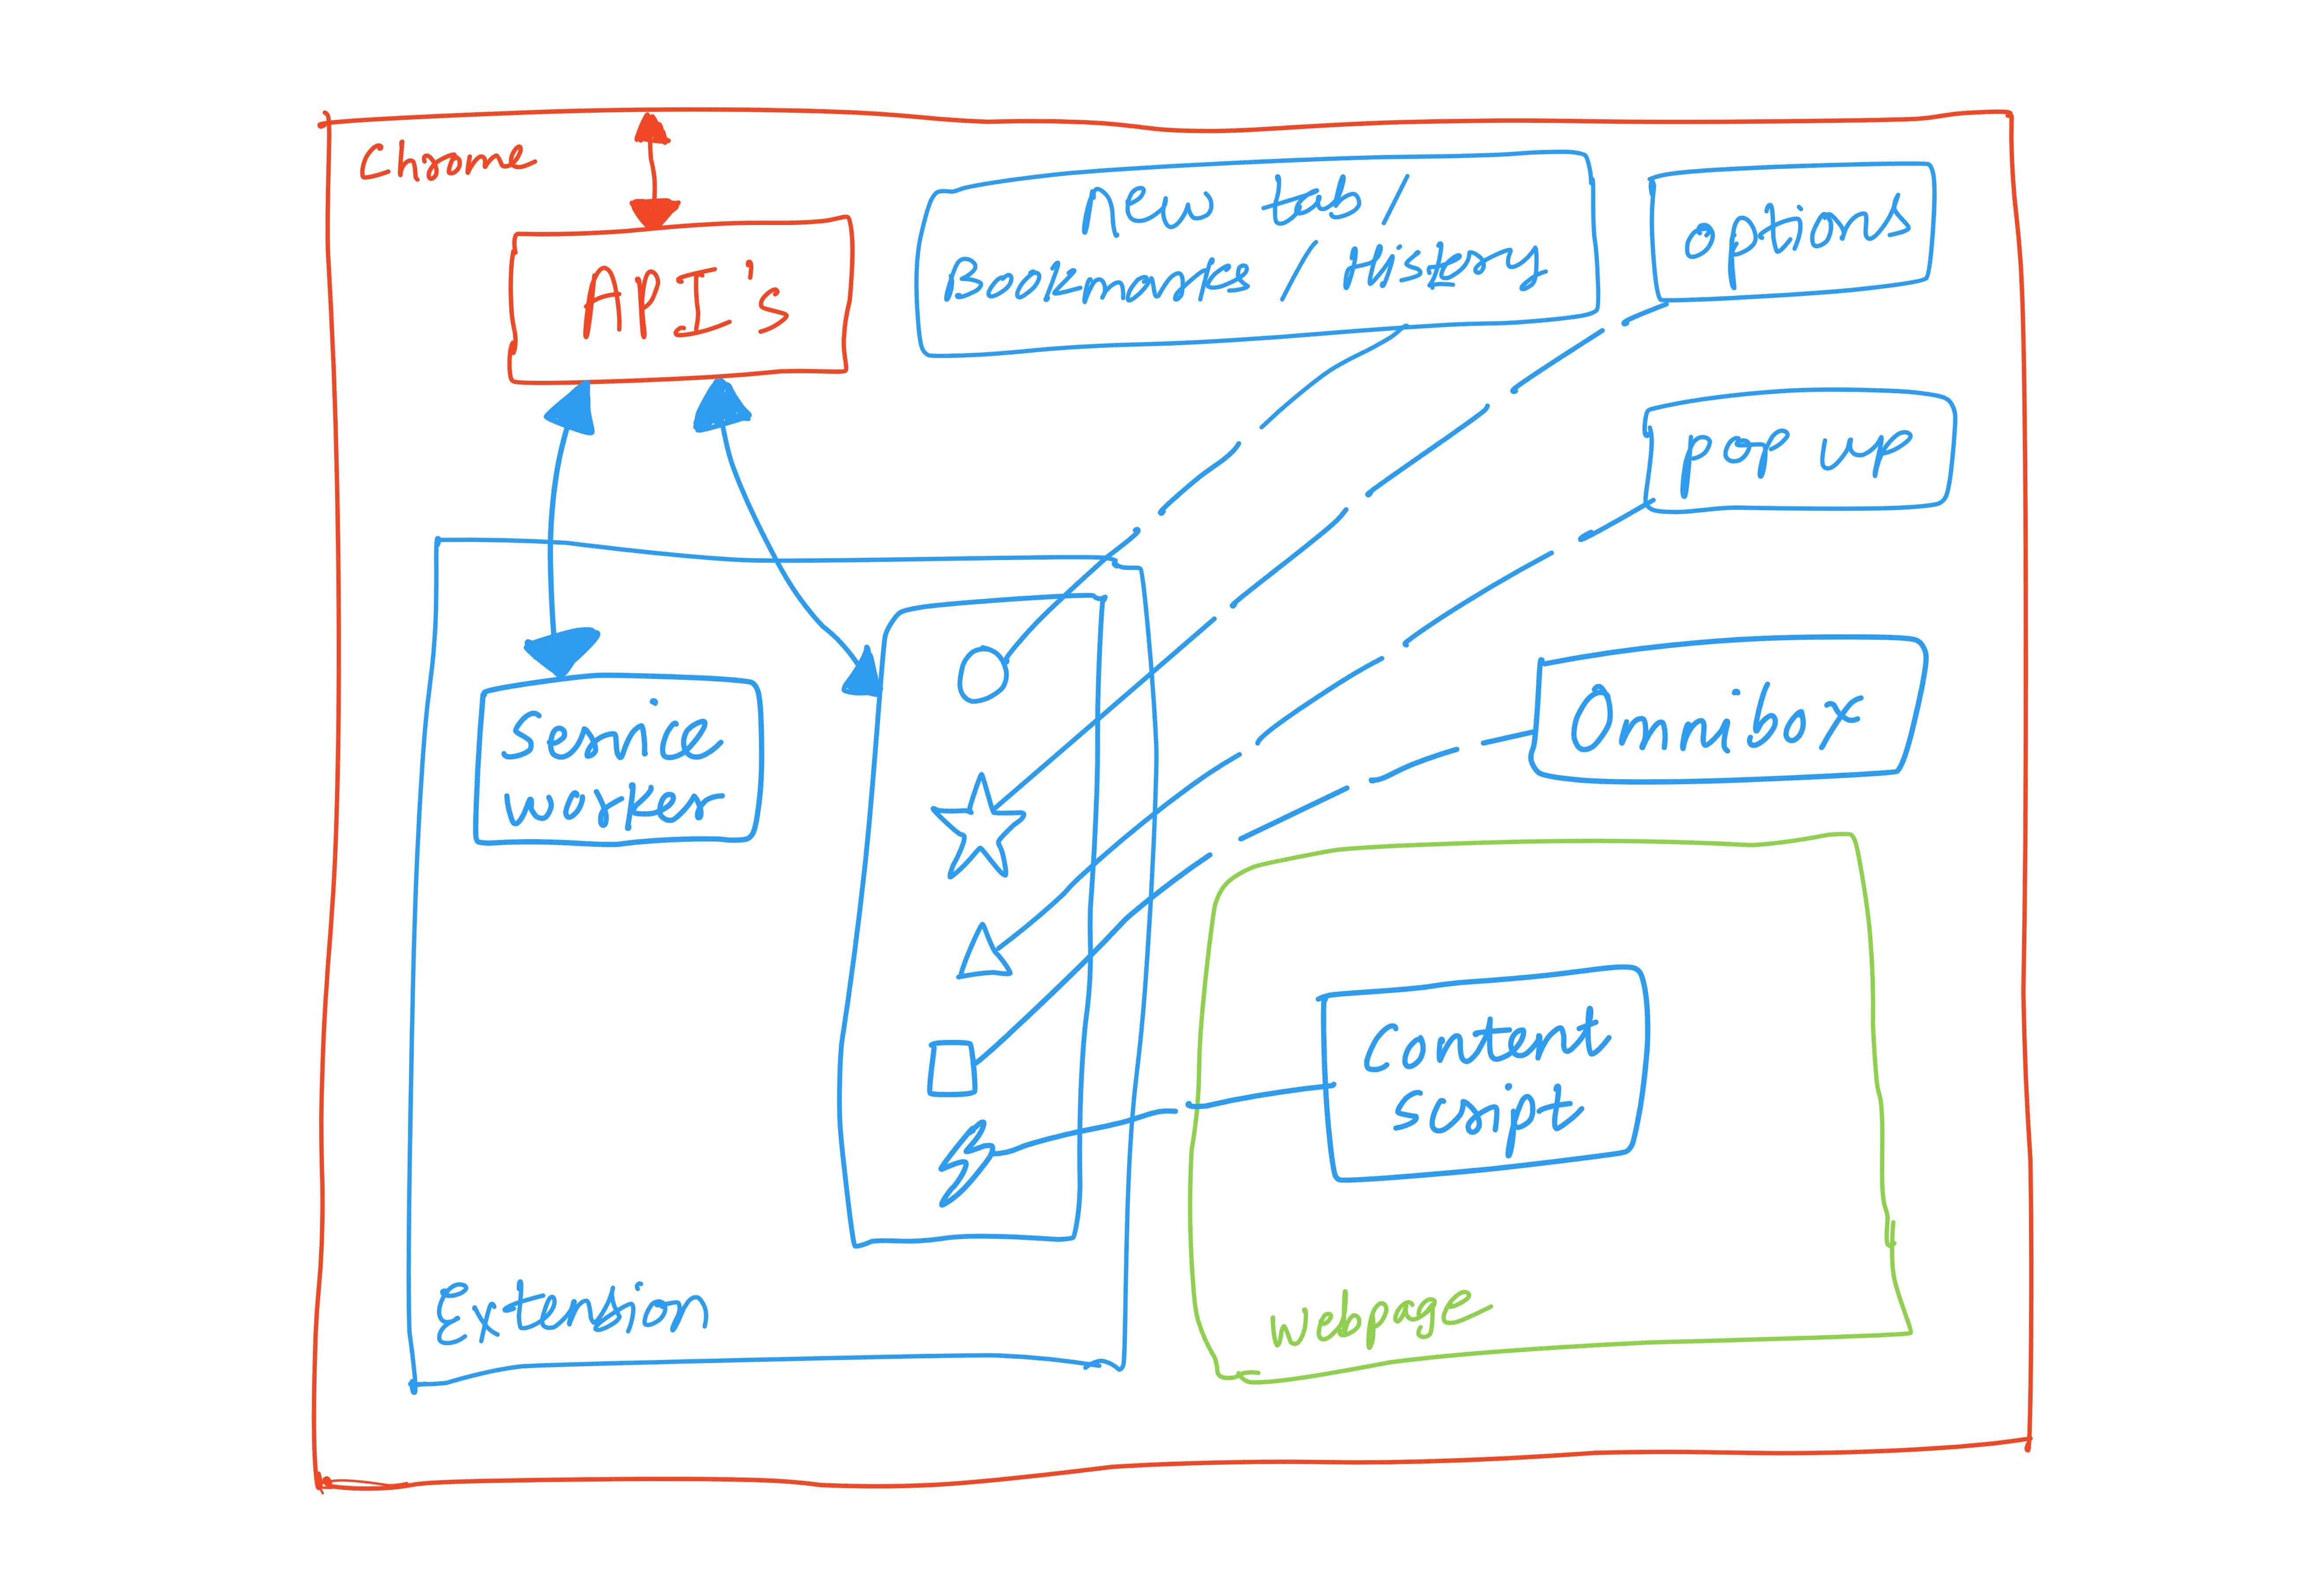
Let's have a look at how the various components fit together.
Chrome browser
The red outer boundary in the diagram above is the Chrome browser itself. Everything, as you'd expect, sits inside this boundary.
Webpage
When you visit a website, it loads inside Chrome's browser. The green box to the bottom right signifies the context of the webpage that was loaded.
APIs
Like any other great product, Chrome, too, offers a set of APIs which allow an external application to interact with Chrome. These APIs are public and their usage has been documented here. Later in this article, we'll see an example of using these APIs.
Extension
A Chrome extension sits inside the boundaries of the Chrome browser. A Chrome extension supports a bunch of features that all sit inside its context, and from within the context of an extension, these features are able to interact with the Chrome browser using Chrome's APIs.
- Service worker: This is an event listener that sits in the background within the context of an extension. As an extension developer, you can configure your extension to behave a certain way when certain events are triggered. For example, Google Meet Exit Page redirects you to another webpage after you've clicked the Leave call button.
- Content script: You can provide a JavaScript file as part of your extension that will be injected into certain web pages and will allow you to change elements in the DOM (explain). For example, Amazon to Goodreads Navigator adds a 1-click 'View in Goodreads' button on Amazon book pages to easily navigate from Amazon to the book's Goodreads page.
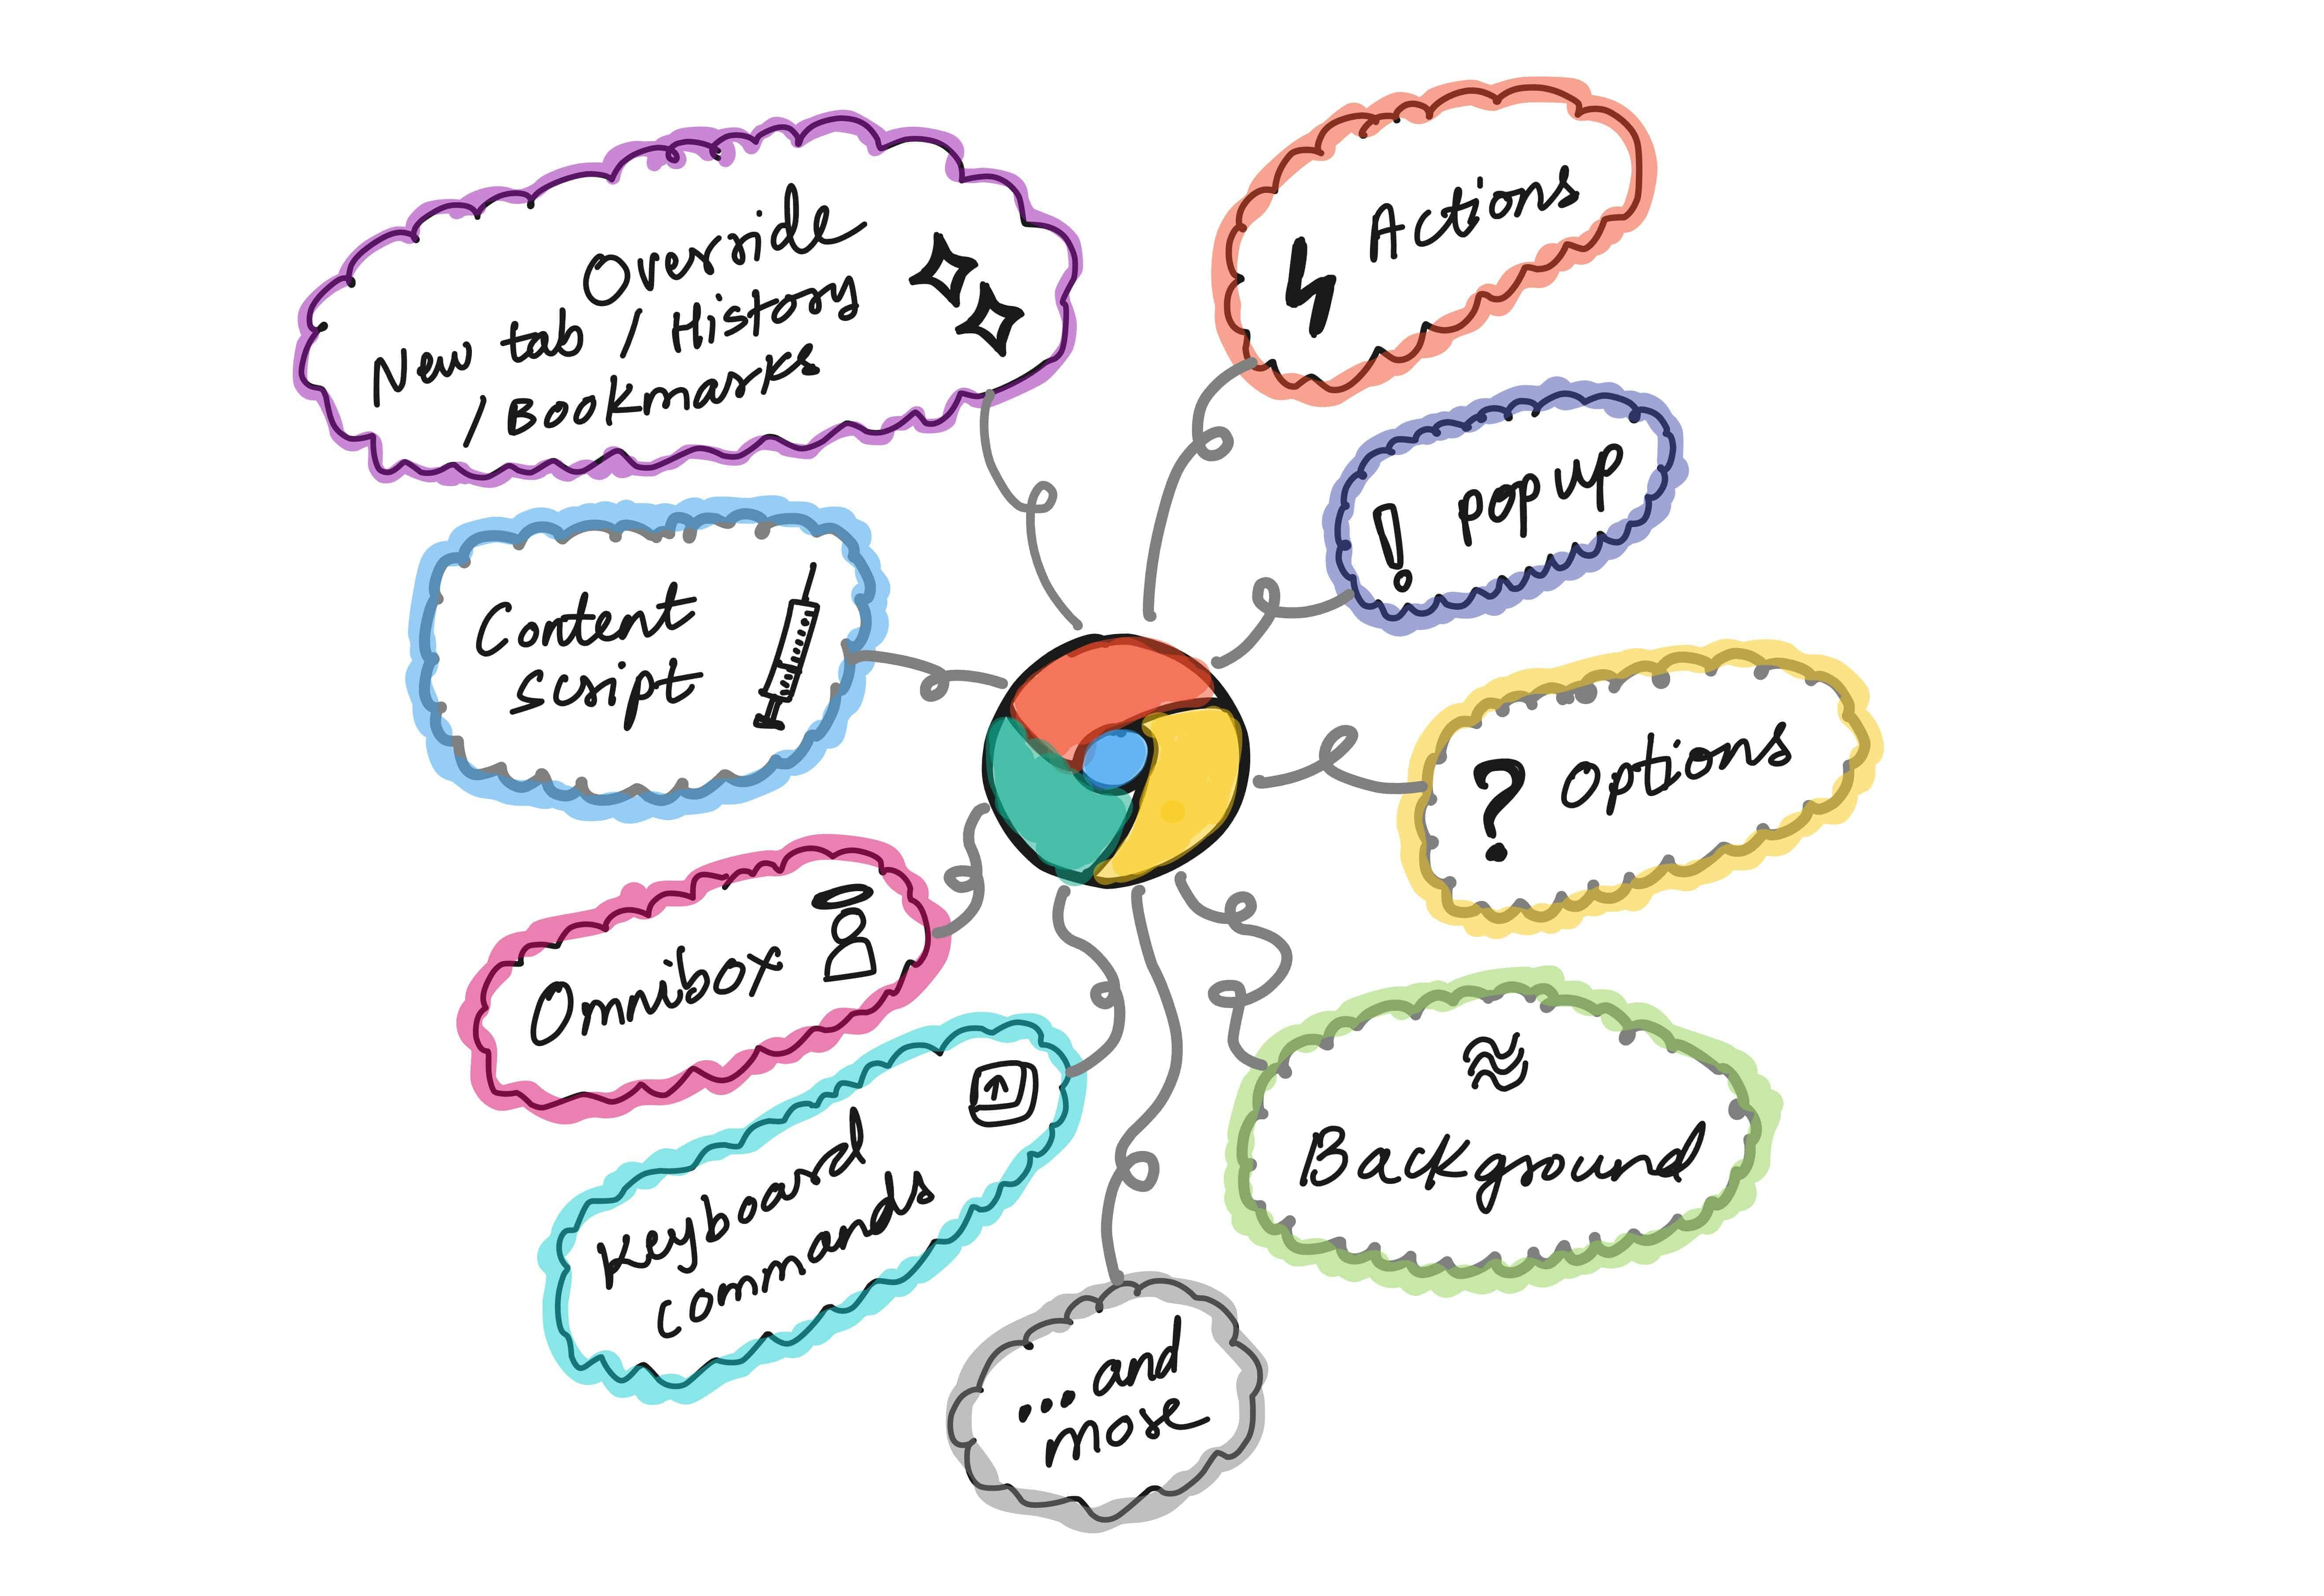
- Popup: As an extension developer, you can choose to open a UI popup box when the extension's icon (also called an Action) is clicked from the toolbar. You could use the popup UI to provide all of your extension's functionality or use this space to allow users to configure certain settings. For example, Retro Notes uses the popup UI to provide functionality for quickly taking retrospective notes.
- New tab/Bookmarks/History: Chrome allows you as an extension developer to override the default Chrome pages for a new tab, the bookmarks page and the history page. An extension may only override one of the three, though. For example, 4–7–8 Breathing overrides Chrome's new tab to provide a clean interface that guides you through the 4–7–8 breathing exercise.
- Omnibox: Chrome's address bar is also known as the Omnibox and you can configure your extension to listen for specific keywords typed into the Omnibox. Once you've detected that event, you could provide suggestions based on the value typed or perform an action on that value. For example, DuckDuckGo Search extends the Omnibox so that when a user types 'DDG' followed by a space in the address bar and then types their search query and hit the enter key, a search is performed on DuckDuckGo with the search terms entered.
- Options: Chrome encourages extension developers to allow users to be able to customize the behaviour of an extension. One way of accessing the options page for an extension is to right-click the extension's icon from the toolbar and click on Options. This should either open up an options popup modal or redirect you to a full-page options interface, depending on what the extension developer has configured. For example, Jira Status Colours provides an options page to customize the colours of your Jira status labels.
In action: Overriding Chrome's new tab
We've briefly looked at quite a few features above, but for the brevity of this article, we'll be taking a look at developing an extension with a single feature — overriding Chrome's new tab.
Manifest file
The manifest file is a JSON file that tells Chrome what features will be enabled in this extension and also provides some metadata about this extension. This file will be placed in the root directory of your extension's code.
A simple starter manifest JSON file might look something like the snippet below. We've specified some metadata and also included the path to our extensions icons. Needless to say, in the icons folder, you might want to place three PNG files that match the names given in the snippet below. This is what my changes look like at this point.
{
  "manifest_version": 3,
  "name": "Simple Chrome Extension Template",
  "description": "A simple Chrome Extension created using a template",
  "version": "0.0.1",
  "author": "Clyde D'Souza",
  "icons": {
    "16": "icons/icon16.png",
    "48": "icons/icon48.png",
    "128": "icons/icon128.png"
  }
}
The complete reference to all properties in the manifest JSON file can be found here.
Overriding Chrome's new tab
Let's update our manifest file and register this feature. We'll add the following snippet to the manifest file. This assigns the newtab.html file as Chrome's new tab. Also, you don't have to name this file newtab. It could be named anything you like.
"chrome_url_overrides" : {
    "newtab": "newtab.html"
}
Creating the HTML file
In the root directory of your extension's code, create a simple HTML file newtab.html. You could perhaps print the traditional 'Hello world' message on-screen if you like. You could also create a CSS file with basic styling like text or background colour and maybe even a JavaScript file that prints a message to the console. If you're including a CSS and JavaScript file, don't forget to reference these files in your HTML file. This is what my changes look like at this stage if you want to follow along.
At this stage, there is nothing peculiar about these files. If you've developed a website, then it's business as usual. And that's the beauty of developing an extension — for the most part, it's just like web development, and only in certain cases, you'd need to write extension-specific code.
To reiterate what was mentioned earlier in this article, think of this as just developing web applications and packaging them inside an extension.
Testing it locally
As of now, we've developed a very simple extension that should override Chrome's new tab with an HTML file that prints a simple message. But how do we confirm if this is what will happen? We need a way to test it locally before we're happy with these changes and publish it to the store for everyone else to use.
First, we need to enable Developer mode in Chrome by heading to the Chrome extensions page chrome://extensions/. Now, click on the Load unpacked button and browse to the extension's root directory where your code exists. Then click on Select folder to load and install your extension.

Now, if you click on the new tab, you should see your HTML page. Ta-da!
Publishing your extension
Using a Google account, you will want to register as a Chrome Web Store developer. You'll be asked to accept the developer agreement and also pay a one-time registration fee of $5.
The next step will be to complete your account information. Some of this information will also appear on your extension's page like your email address and name.
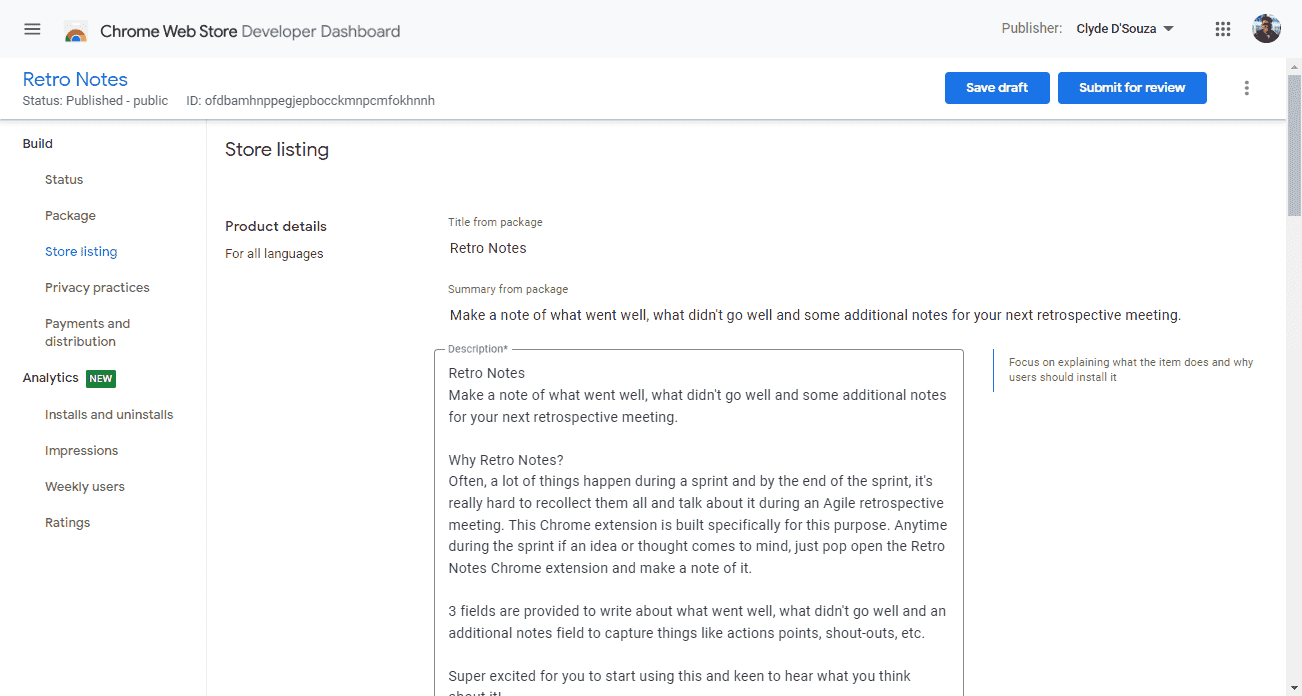
Click on the + New item button to create your first extension. It will ask you to upload a ZIP file of your extension. To get this, just ZIP the extension's source code folder and then upload it here. The Developer Dashboard will read your manifest file and auto-populate a few fields. The remaining fields are left up to you to complete.
While most of it is pretty self-explanatory, here are a few things to consider while filling up the extension information in the Developer Dashboard:
- Store listing: For this page, you might require a bunch of images like an icon and screenshots. I've created this Figma template to assist with this process.
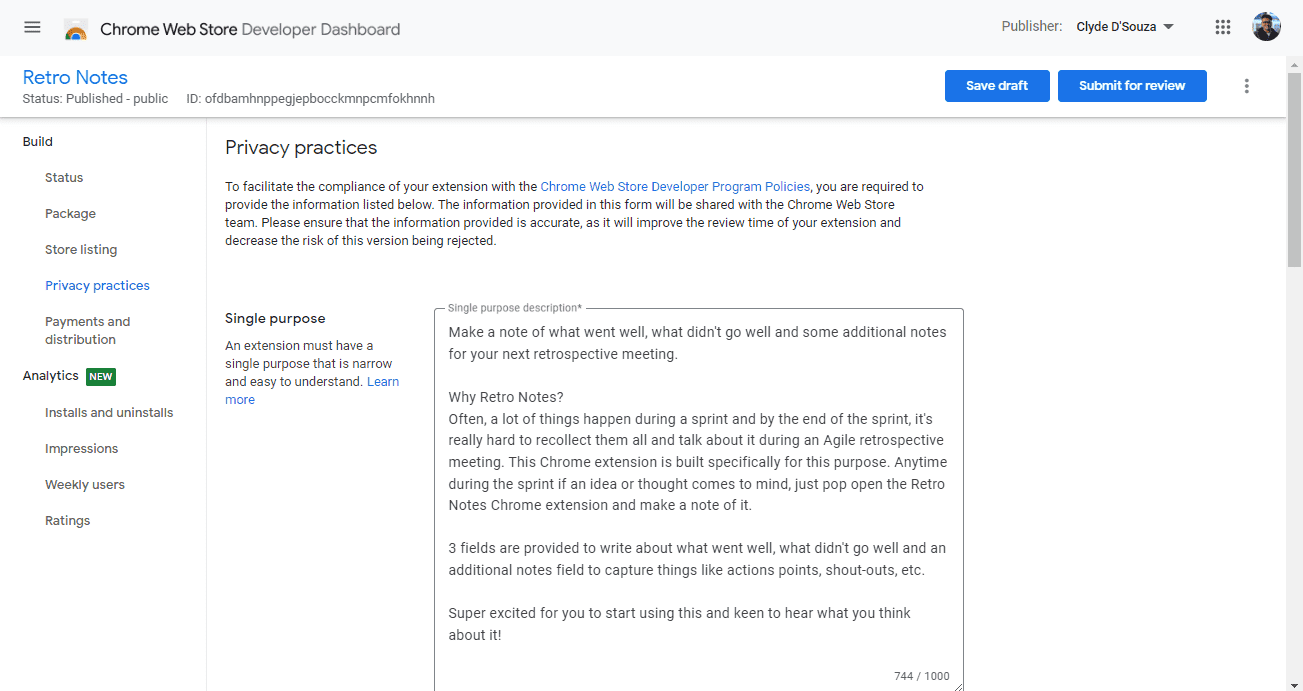
- Privacy practices: This page is where you justify if you've asked for specific permissions in the manifest file. For example, if you've asked for storage permissions, you might want to write a short blurb about how you intend to use that. On this page, you might also want to check a few boxes if your extension uses personal data in any way and also check the disclosure boxes.
- Preview: When filling up the fields, if you're unsure where and how they'll be displayed on your extension page, click the three dots on the top-right of the screen and then click the Preview button. This will populate the information you've filled up so far and will show you a preview of what your extension page might look like.
Once you're happy with what you've filled up, click on the Submit for review button. Your extension will sit in review status for a few days before it gets published. You can then share your Chrome extension with your friends and family.
A complex scenario
The example above was super simple so it's easy to understand the entire process, however, in real life, your extension's code might look a bit more complex. For instance:
- If you're using multiple JavaScript files, you might want to bundle them together and minify them into a single JavaScript file. In this case, you wouldn't want to include the source JavaScript files in the ZIP folder you publish to the Chrome Web Store.
- If you're using Sass for styling, you might need a preprocessor that converts them into a minified CSS file. In this case, you wouldn't want to include the source Sass files in the ZIP folder you publish to the Chrome Web Store.
- If you're using React to develop the web application, you might want to include the appropriate build process that compiles it into the relevant output files. In this case, you wouldn't want to have the React component files in the ZIP folder you publish to the Chrome Web Store.
- If you're writing unit tests, you wouldn't want to include those files in the ZIP folder you publish to the Chrome Web Store.
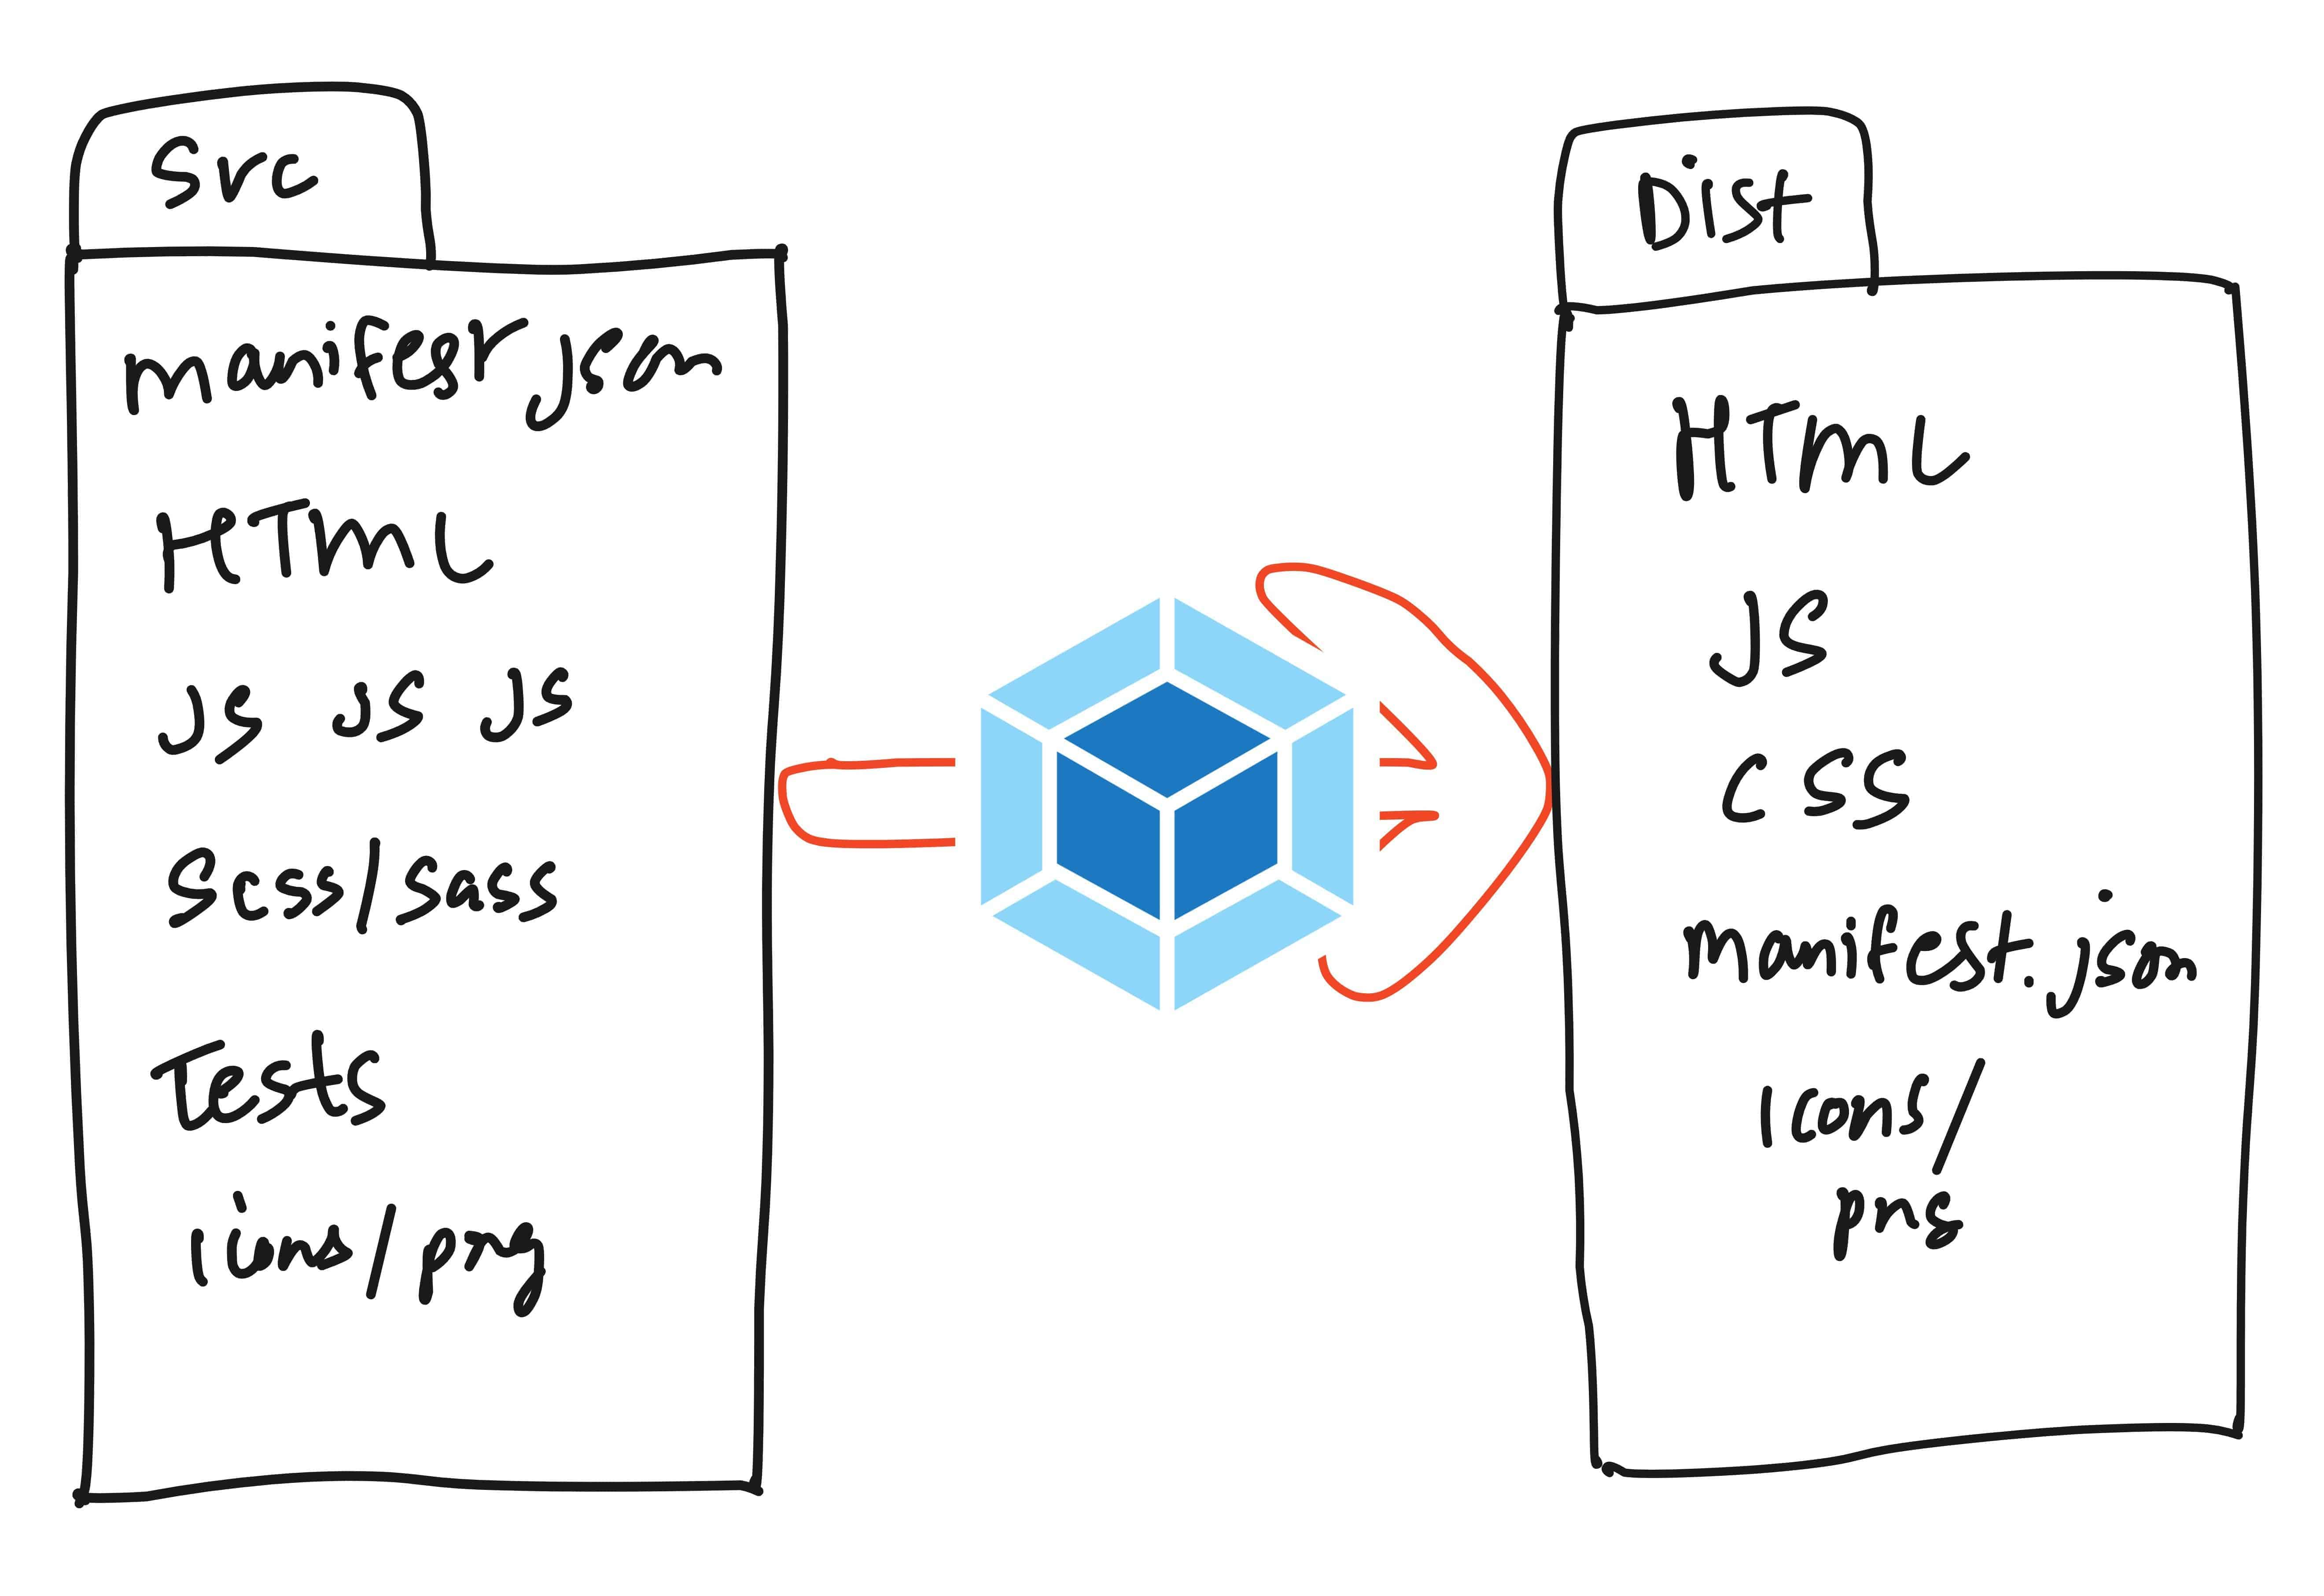
Webpack can be used as one option to solve part of the problem. Webpack helps bundle and minify these JavaScript files, compiles and minifies Sass files, and you can also copy files across to the right directory using Webpack. A typical build would look like running a single command npm run build which will produce the output in a folder, e.g. dist. This folder is the extension's code that you'd want to ZIP and publish to the Chrome Web Store.
Automatic build and deployment
Conceptually, at the very least, you want your build process to create that ZIP file for you automatically. If you're using something like React, you might want to run a build command before creating that ZIP.
For deployments, you'll need to upload this ZIP file to the Chrome Web Store programmatically. The following code snippet is from the GitHub workflow file that builds and deploys a Chrome extension. The code snippet below is the publish step that uses the Klemensas GitHub action to publish your ZIP file. All you need to do is supply the client ID, refresh token, client secret and Chrome app ID. Here's an external document on how to get these values.
- name: Publish to Chrome store
  uses: Klemensas/chrome-extension-upload-[email protected]
  with:
    refresh-token: ${{ secrets.CHROME_REFRESH_TOKEN }}
    client-id: ${{ secrets.CHROME_CLIENT_ID }}
    client-secret: ${{ secrets.CHROME_CLIENT_SECRET }}
    file-name: './extension.zip'
    app-id: ${{ secrets.CHROME_APP_ID }}
    publish: true
Using Chrome APIs
For a complex extension, you might want to use one or more of the various Chrome APIs available. Let's say you wanted to get all the bookmarks, you could add the following code snippet to your JavaScript file and that would print all the bookmarks into the developer console. Obviously and more realistically, instead of printing it to the console, you could loop through them and perhaps display it on the UI.
chrome.bookmarks.getTree(function (results) {
  console.log(results)
})
Requesting permissions
If you tried just the step above, you'd notice that it actually doesn't print the bookmarks in the console just yet. Instead, you get an error message.
The reason for this is to use most Chrome APIs, you'd have to declare permissions in the manifest file so Chrome knows explicitly what your extension will be requiring rather than giving access to all. The full list of permissions can be found here.
For our example, to use bookmarks, you'd have to add the following code snippet into the manifest file, reload the extension into the browser, and then when you try again now, it should work as expected.
"permissions": [
  "bookmarks"
]
Based on what permissions you declare in this file, you'll need to also write up its intent in the Chrome Web Store Developer Dashboard.
Wait, it's not only Chrome
You can also publish your Chrome extension to Microsoft Edge. In most cases, you might not need to make any changes, but it's a good idea to go through the port your extension page. The complete guide to publishing a Microsoft Edge extension can be found here.
That's it! Thanks for reading.