- Published on ·
- Reading time 12 min read
Takeaways From Updating My Website
Includes generating an API from Markdown files and a lot more
Share this page

Introduction
Earlier this month, I released a major update to my website that I had been working on for many months. This update was packed with a lot of technical changes like rewriting and redesigning my website, adding an API to host my portfolio information, adding multiple other microsites and a lot more. This article aims to unpack all of these technical changes and hopes to inspire other minds that might read this.
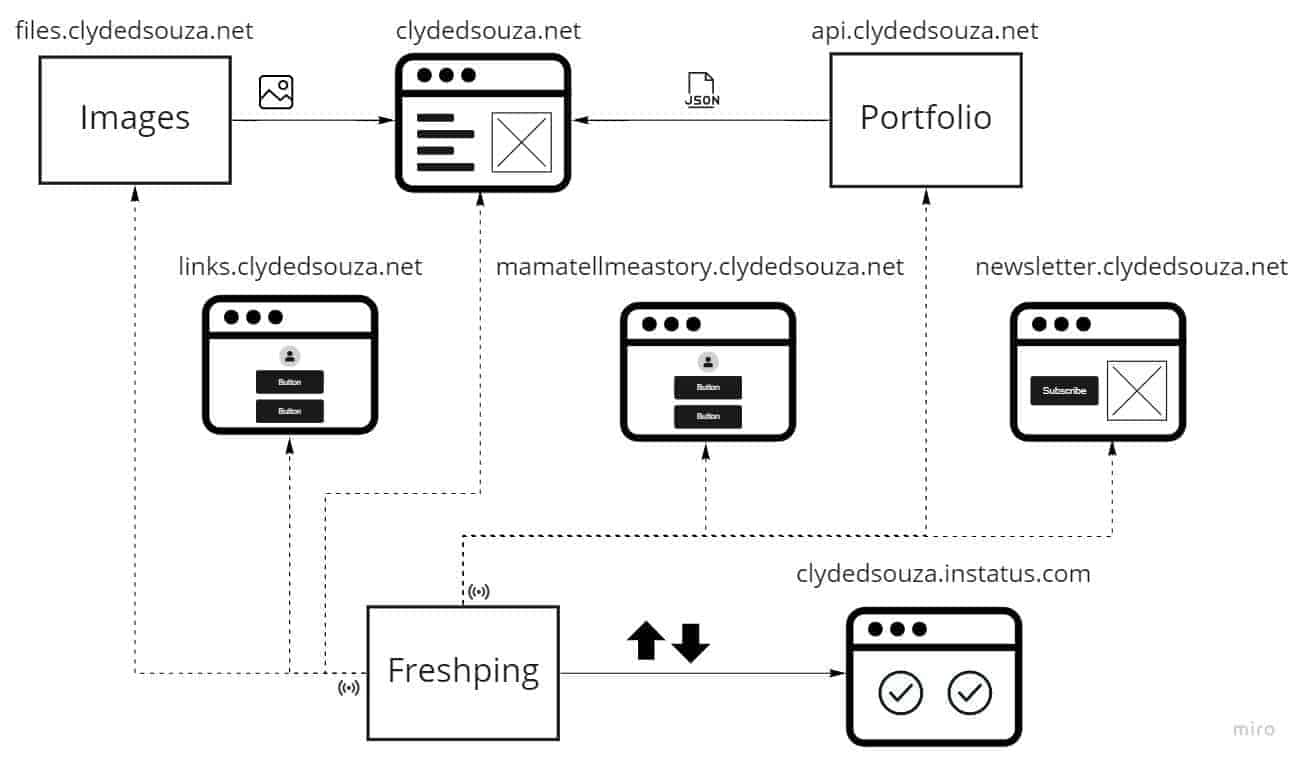
High-level architecture diagram of the website
Website redesign & rewrite
User experience
One of the drawbacks of my old website's design was that all my work needed to fit under a single Projects tab. With the list of projects increasing year-on-year, this screen grew very large needing to scroll a lot to get to the bottom of the list. The screen also didn't have any filters or a search box to get a refined view of the list. To fix this, the new website design includes navigation tabs on top of the screen which allows me to broadly classify my portfolio into four categories — projects, speaking, teaching and books. Each of these screens also includes a search box to quickly refine the list of projects and a toggle to show inactive projects — these include projects that are not maintained and might not function 100% as a result of various factors.
New — categorized navigation and searchable results. Old — simple navigation without a search box.
I've also included a Highlights section in the home screen which allows me to feature certain projects. I tried to do that in the old website using a card but that just felt limiting.
New — a highlights section on the homepage allowing me to pin selected projects. Old — a single card in the home screen highlighting a specific project.
I've also added a call to action in the sidebar for subtly drawing user's attention — like in-app advertisements but not in-your-face. On a mobile screen, this section is moved to the footer of the website with a slightly different background colour than the rest of the website.
GIF showing the call to action section in desktop and mobile devices.
The old website included a Facebook Messenger button in the bottom-right corner of the screen as a way for visitors to quickly message me. However, I noticed that messages would not appear in my inbox but instead go to the Message Requests screen which I would never check. Also, it was probably not the best idea and it also doesn't look too professional to get visitors to message me directly on Facebook. So, for version 2.0, I've used Tawk.to which is a real-time live chat software. They provide a JavaScript code snippet that I need to add into my website and, lo and behold, I have a live chat feature enabled on my website. Tawk.to provides a nice dashboard where I can reply to all incoming messages even when I'm not online when a visitor messages me.
New — a Tawk.to chat icon in the bottom-right of the screen. Old — a Facebook Messenger icon in the bottom-right of the screen.
I've also moved away from Material Design as it was time for a visual refresh and have also moved away from Material design icons since they stopped providing brand icons. The design of the website is inspired by Gitfolio and for the icons used on the website, I've gone with Font Awesome. The colour scheme, however, remains the same as I wanted to retain brand familiarity for returning visitors.
GIF showing the new website design versus the old website design.
Technical details
I was using Angular 1.x along with Angular Material. Angular 1.x became obsolete a long time ago and the current version at the time of writing this is 11.0.0. So, for version 2.0 of my website, I've removed the Angular dependency totally and have kept the tech super simple — HTML, CSS and JavaScript.
I'm using a templating library called Mustache.js which makes it easier to display repeating items like the list of projects. Combined with jQuery, I've also made the website feel like using a Single Page Application (SPA). This is done by making most of the content it's own partial view and then loading it in and out depending on what navigation item is clicked or what URL is visited.
I'm also using Sass which gets compiled into CSS. Sass provides great features like variables, partial files, nested rules and mixins. Once you start using Sass, it will start to feel very natural and you probably wouldn't want to go back to using CSS. As I'm using Visual Studio for development, I'm using this Visual Studio extension to compile Sass into CSS.
I'm also using the Bundler & Minifier Visual Studio extension to bundle different JavaScript files into a single file and minify the file. For faster page loads, it's recommended to load fewer files. Bundling allows us to combine multiple JavaScript and CSS files into a single JavaScript and CSS file respectively. This means that instead of requesting ten JavaScript files when a request is made to the website, the browser has to now only request one. Minification helps to reduce the file size by removing the whitespace in files and performing all sorts of code optimization without changing the underlying functionality.
Speaking of page loads, since there are plenty of images on the website, I'm using the Image Optimizer Visual Studio extension to compress the image size which would help with a faster page load.
I'm continuing to use Google Analytics for general analytics around the usage on my website. In addition to that, I've added Clarity for heatmaps as I'm keen to understand what elements of the website are clicked the most.
API for portfolio items
In version 1.0 of my website, I was using a single JSON file to store information about my projects. Initially, this worked fine but as the list of my projects grew, this JSON file became difficult to maintain.
So for version 2.0, I moved my project information into its own GitHub repository and I started using Markdown files to store information about my projects. The idea was to have one Markdown file for each project — the meta-information will be stored as Front Matter and below that, I have the opportunity to add more details around each project which I can then show on a project details page — the latter part isn't live yet but is on the roadmap.

High-level diagram outlining the process of adding a portfolio item to consuming that data via the API
Then, in my Azure DevOps build pipeline, I'm using an npm package called processmd to convert these Markdown files into a single JSON file. Yes, the website does end up using a JSON file but importantly, I don't have to edit a JSON file.
I've organised these Markdown files into sub-folders allowing me to broadly categorize my projects into — projects, teaching, speaking and books — all of which are pretty self-explanatory, I think. Within each category, I've organised the files into folders by the year they were made.
On the home page of my website, I'm showing a section called Highlights— which are some projects that I've pinned to the home page. To mark a project as a highlight, I've to change the file extension of the Markdown file from filename.md to filename.pin.md.
I'm using a PowerShell script that runs processmd on my project folder to generate different JSON files — one JSON file for each category, one JSON file for each year and one JSON file for all highlighted projects — without repeating the original content. This is the advantage of decoupling the content from the actual format it's delivered in.
The PowerShell script linked above uses a couple of helper scripts. These helpers are unit tested using Pester and the results of the tests are published to the Azure DevOps build pipeline.
Headless CMS
I've also connected this GitHub repository with Forestry.io which acts as a headless CMS for my Markdown content. Forestry presents a neat UI to update my project information. I've also created a Front Matter Template out of my existing project pages which allows me to easily add new project files via Forestry and get it to automatically add the same Front Matter structure to each project file.
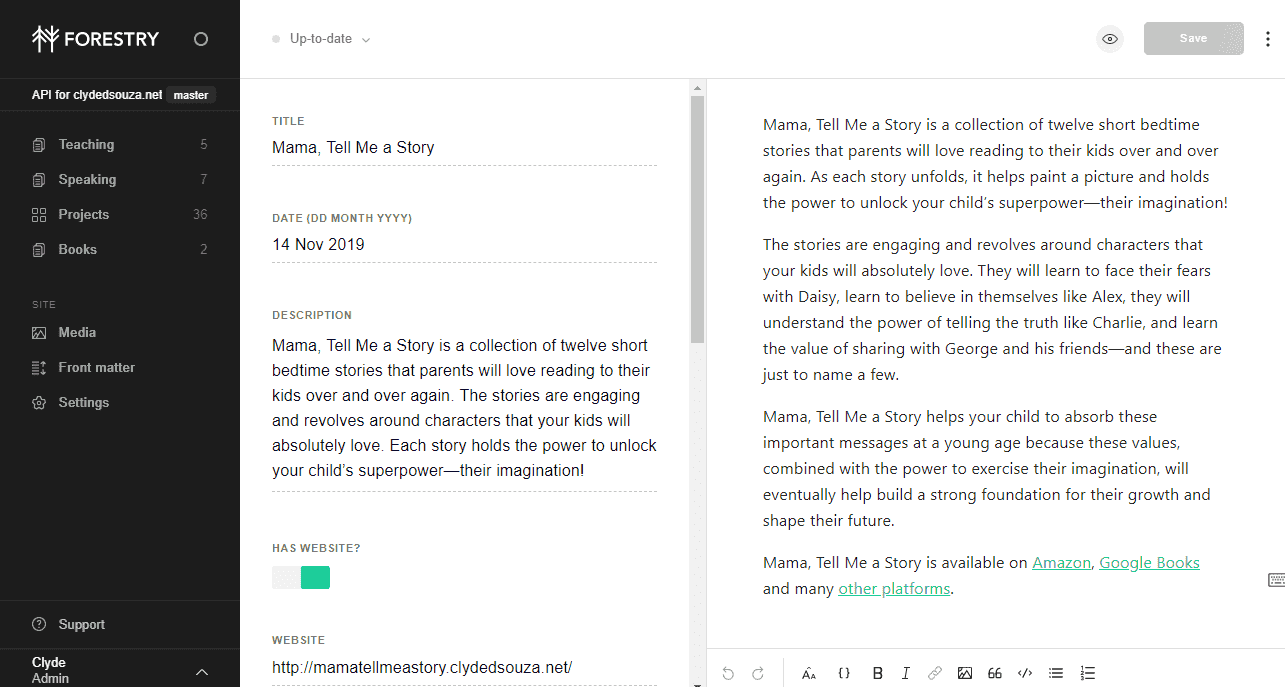
Here's what editing project content in Forestry looks like.
Release pipeline
In my Azure DevOps release pipeline, I'm using the GitHub Pages Publish marketplace extension to publish the build artefacts to the gh-pages branch of the same GitHub repository. These artefacts include:
- the processed JSON files which the website consumes to display project items;
- the original Markdown files which the website will consume to display a project details page; and
- a CNAME file containing the sub-domain for this site
Tip: For setting the commit email address in GitHub Pages Publish, you can use the GitHub provided no-reply email address instead of your personal which should be of the format
[email protected].Read more about it here.
Since I have enabled GitHub pages on the gh-pages branch, my JSON files are now served from api.clydedsouza.net.
Hosting static files
I was originally hosting static files like images, CSS and JavaScript files in the free space allocated by my domain registrar company. Unfortunately, over time this 10MB space has maxed out and I needed to move these files elsewhere. To solve this problem, I've created a GitHub repository to host these static files and have enabled GitHub pages so that these files can be served via the internet.
I've created a build pipeline that gets triggered when a change is made to any of the folders that contain these static files. You can read more about using Path filters to trigger your build pipeline here. The build pipeline archives the contents and makes the ZIP file ready for the release pipeline. I'm using the same GitHub Pages Publish marketplace extension to commit these files to the main branch of the GitHub repository from my release pipeline.

High-level diagram outlining the process of adding an image/CSS/JavaScript file to consuming that file.
Since the static files that were originally hosted in the free hosting space were accessible using the sub-domain static.clydedsouza.net, and since those files no longer exist post-migration, I've created a Cloudflare Page Rule to redirect all requests from the sub-domain static.clydedsouza.net to files.clydedsouza.net. This ensures that any lingering references to the old static site are redirected to the new one.
Side note: I'm using Cloudflare to manage my DNS records. Cloudflare provides a ton of features including DDoS protection, SSL certificate, caching and a lot more.
Public status page
I'd really like a single pane of glass to see the uptime status of all my apps, so I used Instatus and Freshping to create my very own status page. Here's a quick rundown on how I used these services together.
- Instatus: Offers fast-loading status pages with amazing features like email, webhook and RSS updates to users who want to subscribe to outage notifications, automated status updates, planned maintenance messages, components and groups, and a lot more.
- Freshping: Offers website monitoring at 1-minute intervals. The free plan allows you to add 50 monitors.
To automate the operational status change of your components in Instatus, you would need to follow this guide to connect your Freshping account with Instatus. Essentially, this is getting Freshping to email the Instatus component every time a monitor goes down thereby automatically reflecting the status change on your status page.
Why did I choose Instatus instead of Freshstatus?
Instead of integrating Freshping with Instatus, you could also use Freshstatus — which is another service that offers a status page. I did not select Freshstatus because their free plan offered only up to 250 subscribers and although their free plan offered the ability to set a custom domain, they didn't offer SSL which means that the page will be served via HTTP instead of HTTPS which isn't ideal.
Other changes
- I've introduced links.clydedsouza.net and mamatellmeastory.clydedsouza.net as two different microsites as alternatives to using Linktree. If you'd like to build something similar, check out this template on GitHub by Michael Barney. I've added Forestry on top of these two sites to provide me with a CMS functionality.
- I used to have a few redirect-only pages on my old website of the format
clydedsouza.net/project-namewhich would then redirect you to that particular project. In version 2.0 of my website, I've removed all those redirects and have only included a redirect on clydedsouza.net/blog which redirects the user to my Medium profile. I've also added a microsite that's available via blog.clydedsouza.net which also redirects users to my Medium profile. - Lastly, I'm using ConvertKit (referral link) to host my newsletter site.
Conclusion
Wow, that was a lot of information and I'm glad you stuck around till the end. I also hope you enjoyed this journey. If you've been on a similar journey, I'd like to know — let me know in the comments below.
That's it! Thanks for reading.