- Published on ·
- Reading time 14 min read
Lights, Camera, GitHub Action!
Creating a custom GitHub composite action and publishing it to the GitHub marketplace
Share this page

Problem statement
I've been working on updating my personal website and part of my requirement was to be able to compress the images from a mono repo which will host my website code and publish these compressed images into a destination that will serve these images using a sub-domain. This image compression must happen as part of the GitHub actions workflow that will build my website project.
I managed to solve this problem using an image compression CLI tool called imagemin and integrated that into my project. This is great news because it means less manual work and more seamless development. However, the implementation of this solution is specific to my project. How could I make this available to other developers?
This question gave rise to a new problem space — making a reusable GitHub Actions image compression step that developers could make use of in their GitHub workflow files. What's the best way to achieve this? A custom GitHub Action.
GitHub Actions and workflows
First, let's take a look at what GitHub Actions and workflow is.
GitHub Actions enables the automation of your build, test, and deployment pipeline, serving as a platform for continuous integration and continuous delivery (CI/CD).
While a workflow refers to a customizable automated process that executes one or multiple jobs. These workflows are defined using a YAML file and reside within your GitHub repository.
GitHub Actions is more than just DevOps, though. It lets you run workflows when various other events happen in your repository, too. For example, you can employ a workflow to automatically assign the relevant labels whenever a new pull request is created in your repository. Or you can also trigger workflows manually or on a schedule.
Types of actions
There are three types of actions that you could build.
- JavaScript actions: These actions can run directly on a runner machine and since we're only dealing with code here, this type of action is much faster than a Docker container action. The packaged JavaScript code should be pure JavaScript and not rely on other binaries.
- Docker container actions: This approach allows you to package the environment along with the GitHub actions code. This is useful if your action needs a specific environment, dependencies or tools, which can be all packaged up in a container. This does come with a downside of making it slower than JavaScript actions because of the latency to build and retrieve the container. Additionally, Docker container actions can only execute on runners with a Linux operating system.
- Composite actions: A composite action allows you to bundle multiple workflow steps into a single action, which can then be called in any workflow file as a single action instead of having to write all the steps.
Deciding what type of custom action to build
For this problem scenario, I can rule out a JavaScript action since I don't want to write additional code to interface with the underlying imagemin library because that's what the CLI should already be doing under the hood.
I can also rule out building a Docker container action because I don't need to bundle the environment and other dependencies, among other things. From the documentation page, it looks like I'd have to write the required commands in a shell script anyway, so packaging it in a Docker container action seems like overkill. And since Docker container actions can only execute on runners with a Linux operating system, this limits the consumer base for this action.
Therefore, this leaves me with creating a composite action. It's just like a normal workflow file with a bunch of steps and one of those steps will need to execute the CLI. So, let's go with that.
Creating a repository
An action that is intended to be published to the GitHub marketplace must be in a public repository. Think twice about what you'd like to name this repository because that's how your action will be consumed. For instance, when using the action to checkout a repository, we'd write something like uses: actions/checkout@v3 in our workflow file to consume this action. Here, actions is the organization (or username, if you're creating it in your personal account) and checkout is the name of the repository.
We'll add a YAML file called action.yml in the root folder of this repository along with a README.md file. The YAML file is our custom action which will go into depth next.
The readme file will contain a brief description of the custom action and instructions on how to use it which will then get displayed on the action's marketplace page. You could use this readme file for reference.
Tip: If you intend to write tables in markdown and you're using VS Code as your editor, check out this handy VS Code extension. It honestly makes writing markdown such a breeze.
Writing the metadata
In your action.yml file, ensure that you have a suitable name and description written out. This information will appear in the marketplace search results, so it ought to be apt. Author information is optional and GitHub automatically links your account with the action anyway.
name: 'Compress Images'
description: 'Compress all images from the provided directory'
author: "Clyde D'Souza"
branding:
  icon: 'image'
  color: 'red'
The icon and color from the branding section appear to the left of the action name and description in the search results and also on the action's marketplace page, so please choose wisely. The icons can only be one from this list and the color can only be one from this list. If you're publishing an action from an organization account, I believe this icon can be updated to a custom image, but sadly not from a personal account. The full metadata syntax can be found here.
You might've also noticed badges appearing in the action search results. This is available to only those who have published an action under a verified organizational GitHub account. Further information about this can be obtained here.
Accepting inputs
My custom action is going to accept some inputs from the user to customize the way the action will behave.
Under the inputs keyword of the YAML file, we start with writing the input parameter name as the key of the code block, and within that, we'll write some properties. In the snippet below, input-directory is the name of the parameter that the user will supply. The description property allows you to be a little verbose on what you're expecting the user to supply. The default property helps you assign a default value if the user hasn't customized this. The required property helps you set the parameter input-one as a required parameter that the user will have to always supply.
inputs:
  input-directory:
    description: 'Directory that contains uncompressed images'
    default: 'images'

  output-directory:
    description: 'Directory that will contain the compressed images'
    default: 'dist'

  jpg-compression-quality:
    description: 'Set the level of compression for JPG image files'
    default: 40

  png-compression-quality:
    description: 'Set the level of compression for PNG image files'
    default: 0.4

  gif-compression-quality:
    description: 'Set the level of compression for GIF image files'
    default: 2
If you need multiple input parameters, you can continue adding more under the inputs keyword as we did in the code snippet above.
Steps to run
Our composite action will consist of some steps that will install the required image compression CLI tool and then execute the compression command.
To add the steps, we'll start by writing the runs keyword in the YAML file and explicitly mentioning that this is a composite action against the using keyword. Then under the steps keyword, we'll add the required steps just like we'd do if we were writing a simple workflow file in our own private repository.
runs:
  using: 'composite'
  steps:
    - name: Print npm and node version
      shell: bash
      run: |
        npm --version
        node --version
    - name: Install required npm packages
      shell: bash
      run: |
        npm install imagemin-cli imagemin-gifsicle imagemin-mozjpeg imagemin-pngquant --global --loglevel error
    - name: Run image compression
      shell: bash
      run: |
        imagemin ${{ inputs.input-directory }} \
          --out-dir=${{ inputs.output-directory }} \
          --plugin.mozjpeg.quality=${{ inputs.jpg-compression-quality }} \
          --plugin.gifsicle.optimizationLevel=${{ inputs.gif-compression-quality }} \
          --plugin.pngquant.quality=${{ inputs.png-compression-quality }} \
          --plugin.pngquant.quality=${{ inputs.png-compression-quality }}
The first step is completely optional but is useful to troubleshoot if the action suddenly stops working or works unexpectedly. We've add a simple script to print the installed npm and node versions on the runner using the run keyword.
In composite actions, we always need to specify the type of shell we'd like to use when running scripts and/or commands. But what is a shell? It is a program that accepts input from a user and interprets them such that the operating system can understand them. Here's a list of the shells available in the runner.
For our scenario, our script is pretty agnostic so writing bash as the value for the shell keyword will work. However, in certain cases, you might want to be careful about the syntax of the script as that might change depending on the shell. For instance, echo $PATH will work in bash but in pwsh (or PowerShell Core), you'd have to type write-output ${env:PATH}.
The second step in the YAML file above is a script to install the required image compression CLI npm package and the required image compression plugins globally.
The third and final step is to execute the CLI tool. As per their documentation, we need to call the globally available imagemin command and then supply the input image directory. The rest of the CLI parameters are optional but since this is a reusable Action, we have to write it out and parameterize the values. We parameterize the values using the syntax ${{ inputs.png-compression-quality }}.
Testing the action
Even before you publish your action to the GitHub marketplace, you can test your action from another repository very easily. Create a new repository with a main.yml workflow file (you can name this YAML file whatever you like) under the .github/workflows folder and if you need any supporting files to be able to test out your action, include that in the repository too. Since my action compresses images, I've included a public folder with some large images of all formats. This is what my test repository looks like.
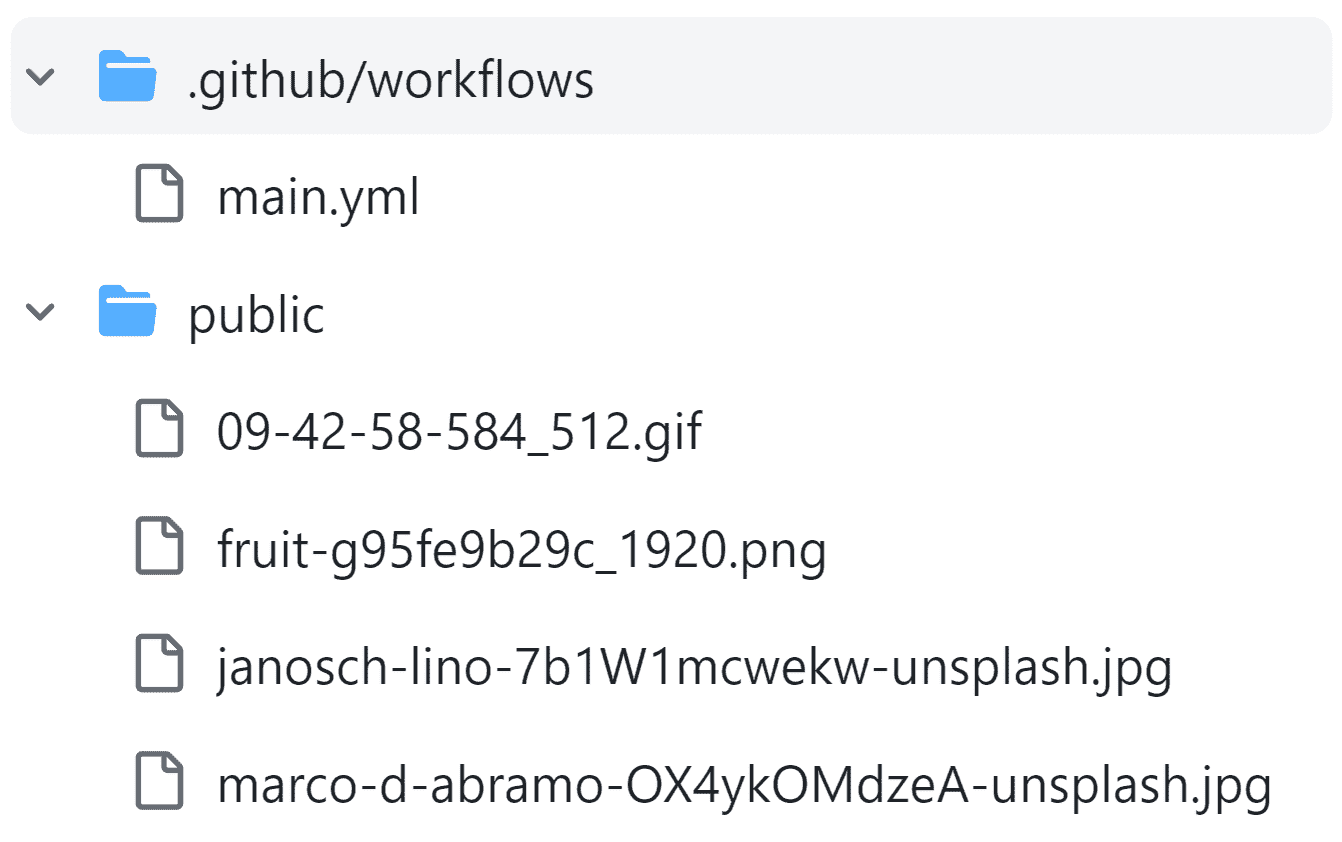
Image courtesy of the author
In terms of what goes in the workflow file, we start by setting the trigger of this workflow file to be manually triggered with the line on: [workflow_dispatch].
Under the jobs keyword, we write the first and only job we'll have in our workflow and assign it a unique identifier action_tester_job. The runs-on and name keywords are optional but it's nice to have them if you have specific requirements.
on: [workflow_dispatch]

jobs:
  action_tester_job:
    runs-on: ubuntu-latest
    name: Action tester
    steps:
      - name: Checkout repository code
        uses: actions/checkout@v3

      - name: Compress images
        uses: ClydeDz/compress-images@main
        with:
          input-directory: public

      - name: Upload files to artifact
        uses: actions/upload-artifact@v3
        with:
          path: ./dist
Under the steps keyword, we'll add the required steps to test out our custom Action. We'll start by checking out the code in our test repository so that the Action has access to, in this case, the public directory which contains all the images.
We then used our custom action ClydeDz/compress-images@main and only supplied the inputs that we'd like to customize, in this case, the public directory which hosts the images. The default parameter values can be left as-is.
But what's compress-images\@main?
As per this section in the documentation, an action can be consumed from a public repository in the following ways:
- A specific commit, e.g.
uses: clydedz/compress-images@8f4b7f84864484a7bf31766abe9204da3cbe65b3. This is the most stable as it references the exact commit that works without any risk of breaking changes being introduced. - The name of the branch, e.g.
uses: clydedz/compress-images@main. This is great to get whatever changes are in specific branches and is also great for just testing an upcoming change to the action. However, when using this in production, this introduces the risk of someone pushing a breaking change to the branch. - A specific version tag, e.g.
uses: clydedz/[email protected]oruses: clydedz/compress-images@v3. Depending on how the author of the action tags the releases, you could use the specific version tag to consume an action. Note, if the author is using the full tagging formatmajor.minor.patche.g.v2.3.4and if you only reference the major version e.g.v2to consume the action, it will fail. A corresponding tag must exist in the repository for GitHub to find the action you're referencing.
Hence, in the code snippet above, we're referencing what's in the main branch since that's the branch that holds the latest developed code.
And finally, we'll need to make these compressed images available outside of the workflow so we can confirm that they're indeed compressed. We'll use the action actions/upload-artifact@v3 to upload the compressed images that will be in the dist directory. This artifact will then be available for download as a ZIP file. Save the workflow file changes that you've made.
To run the workflow, click on Actions tab in your test repository, find and click the workflow from the left sidebar and then click on the Run workflow dropdown. Here you can select your branch and then click on the green Run workflow button.
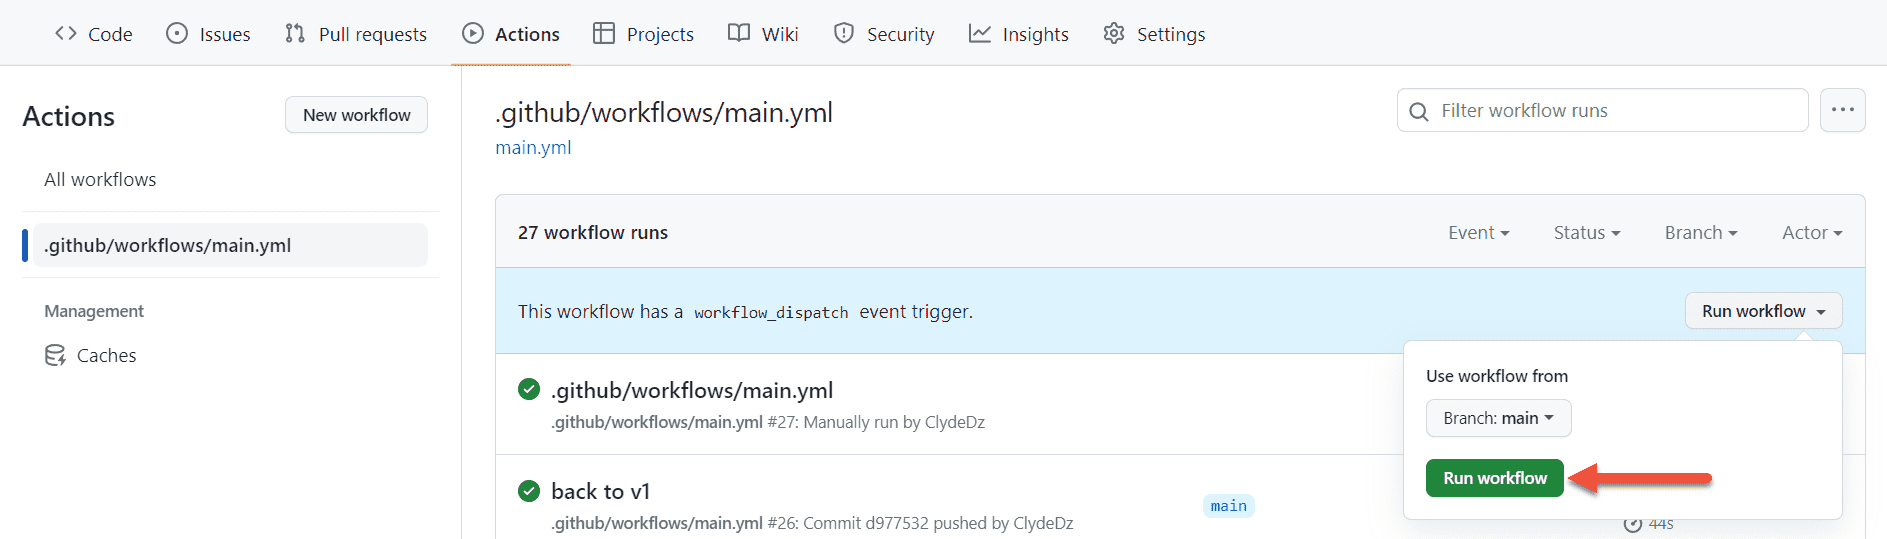
Image courtesy of the author
This will trigger the workflow and run all the steps you've written above. Once it's complete, click on the successful run and then scroll down to see the generated artifacts. Click on the artifact to download the ZIP file.
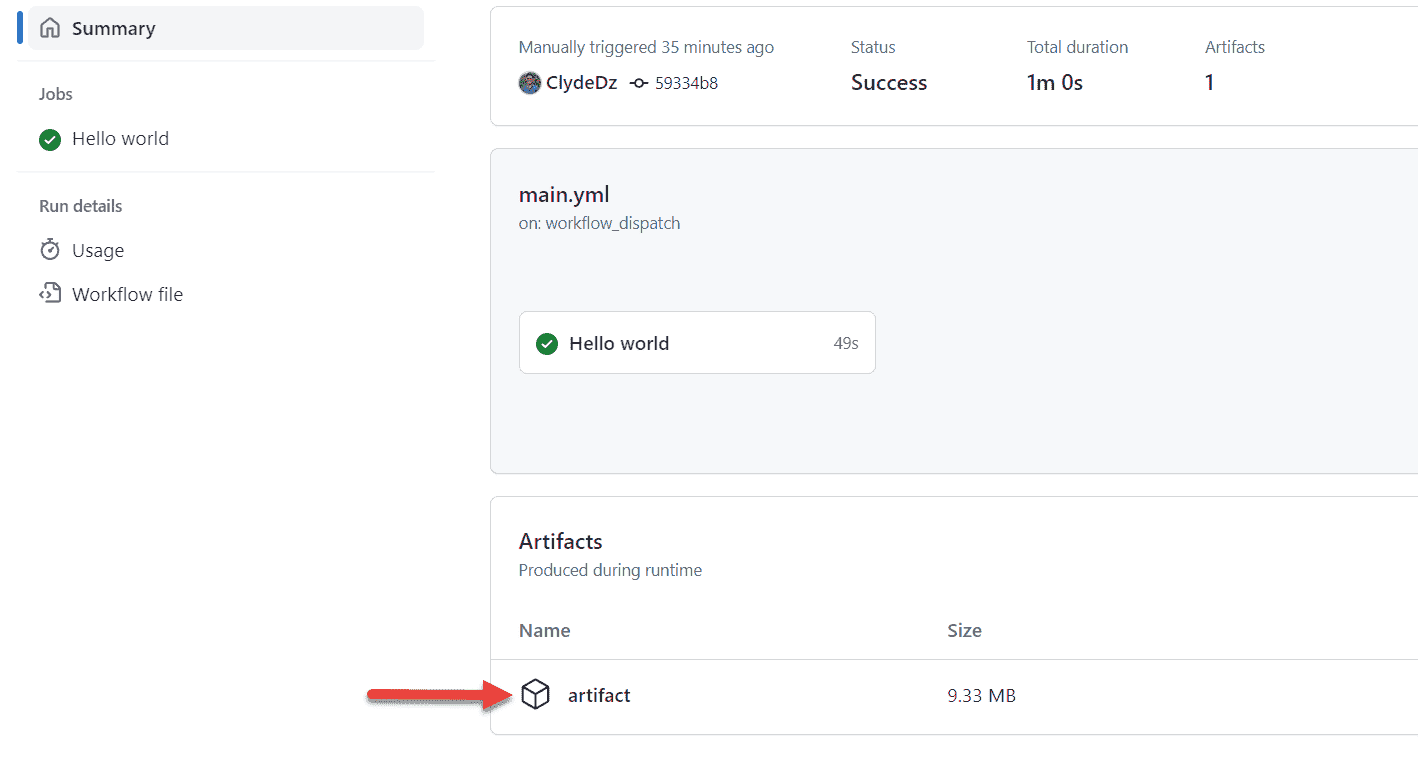
Image courtesy of the author
Once you download and extract the contents of the artifact, you should able to compare the size of the images in the public directory versus the size of the same image in the artifact directory.
Publishing the action
Once you're happy with how the custom action turned out, it's time to publish it to the GitHub marketplace.
Let's head into the repository and click on the Draft a release button that appears on the page.
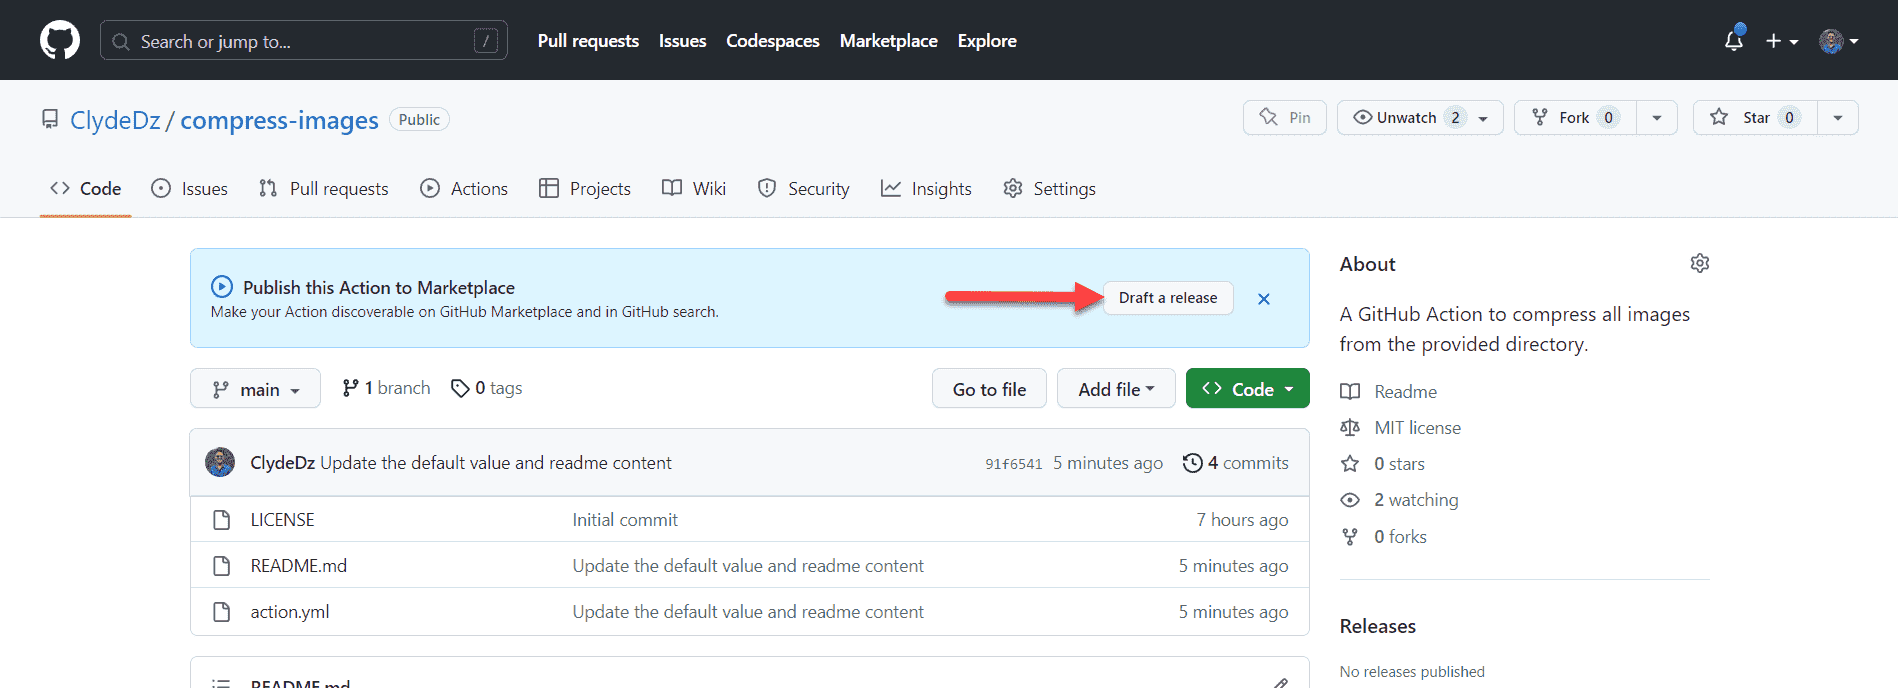
Image courtesy of the author
On the releases page, you'll need to accept the developer agreement before proceeding ahead. In the Release Action section, click the Publish this Action to the GitHub Marketplace checkbox.

Image courtesy of the author
Once you check that box, GitHub will validate if the requirements are met. Additionally, you'll need to set the category and optionally, another category.
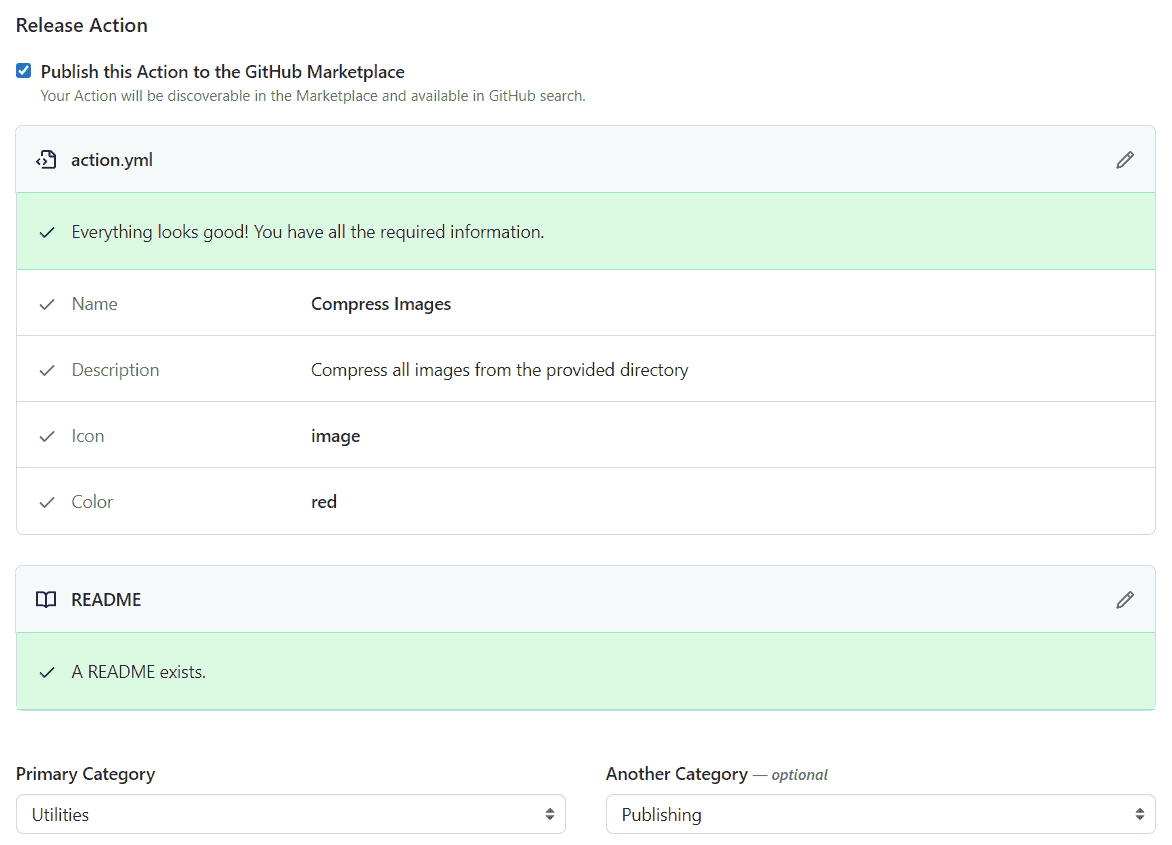
Image courtesy of the author
The release and the tag are named v1.0.0. It's important to note that deciding how to tag your release will affect how your action is consumed. If you're using the full tagging format major.minor.patch e.g. v2.3.4 and if the consumers only reference the major version e.g. v2 to consume the action, it will fail. A corresponding tag must exist in the repository for GitHub to find the action your consumers are referencing.
Once you're satisfied, click on the Publish release button. You might need to authenticate using your choice of two-factor authentication, and once successful, the release will get published.
On the releases page, you'll notice a Marketplace link which will take you to your GitHub actions page.
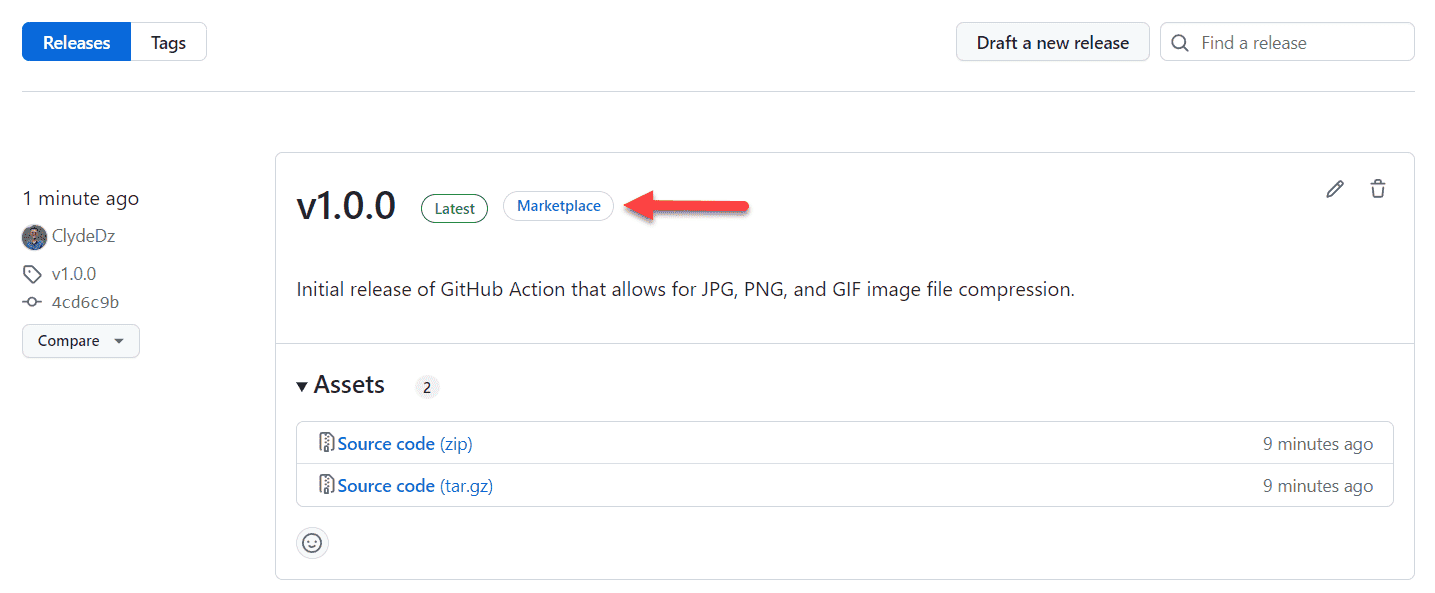
Image courtesy of the author
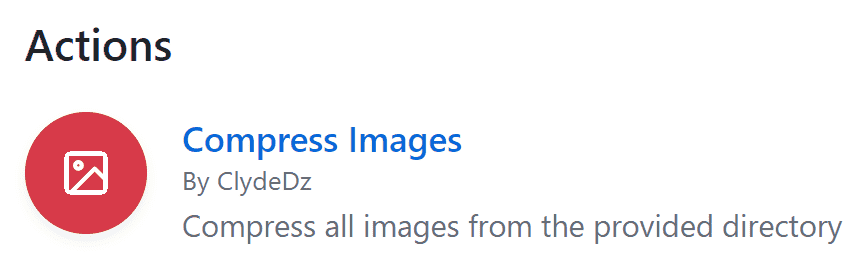
As you can see, the contents of the readme get displayed on the actions page. If you click on the green Use latest version button located towards the top-right of the screen, GitHub should give you a snippet that consumers can copy into their workflow file. The screenshot below is from the action I recently published called Compress Images.
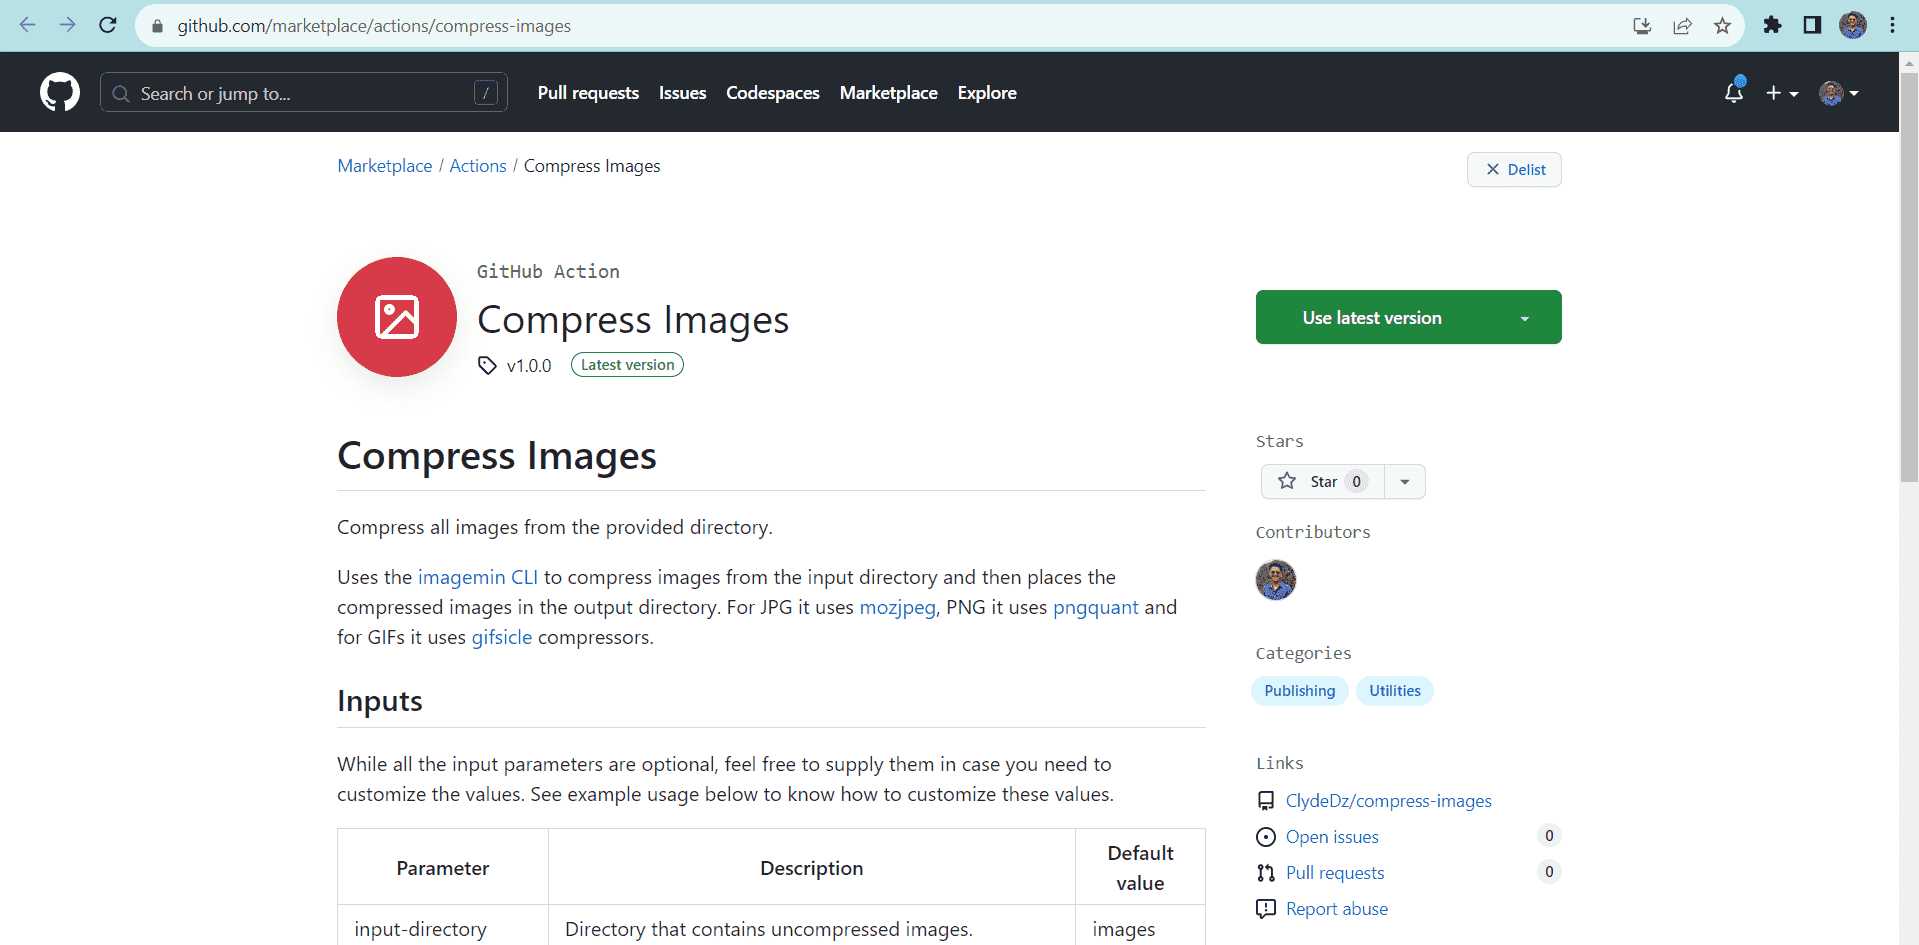
Image courtesy of the author
Back on the repository page, the Draft a release button gets swapped with View on Marketplace encouraging users to use this action.
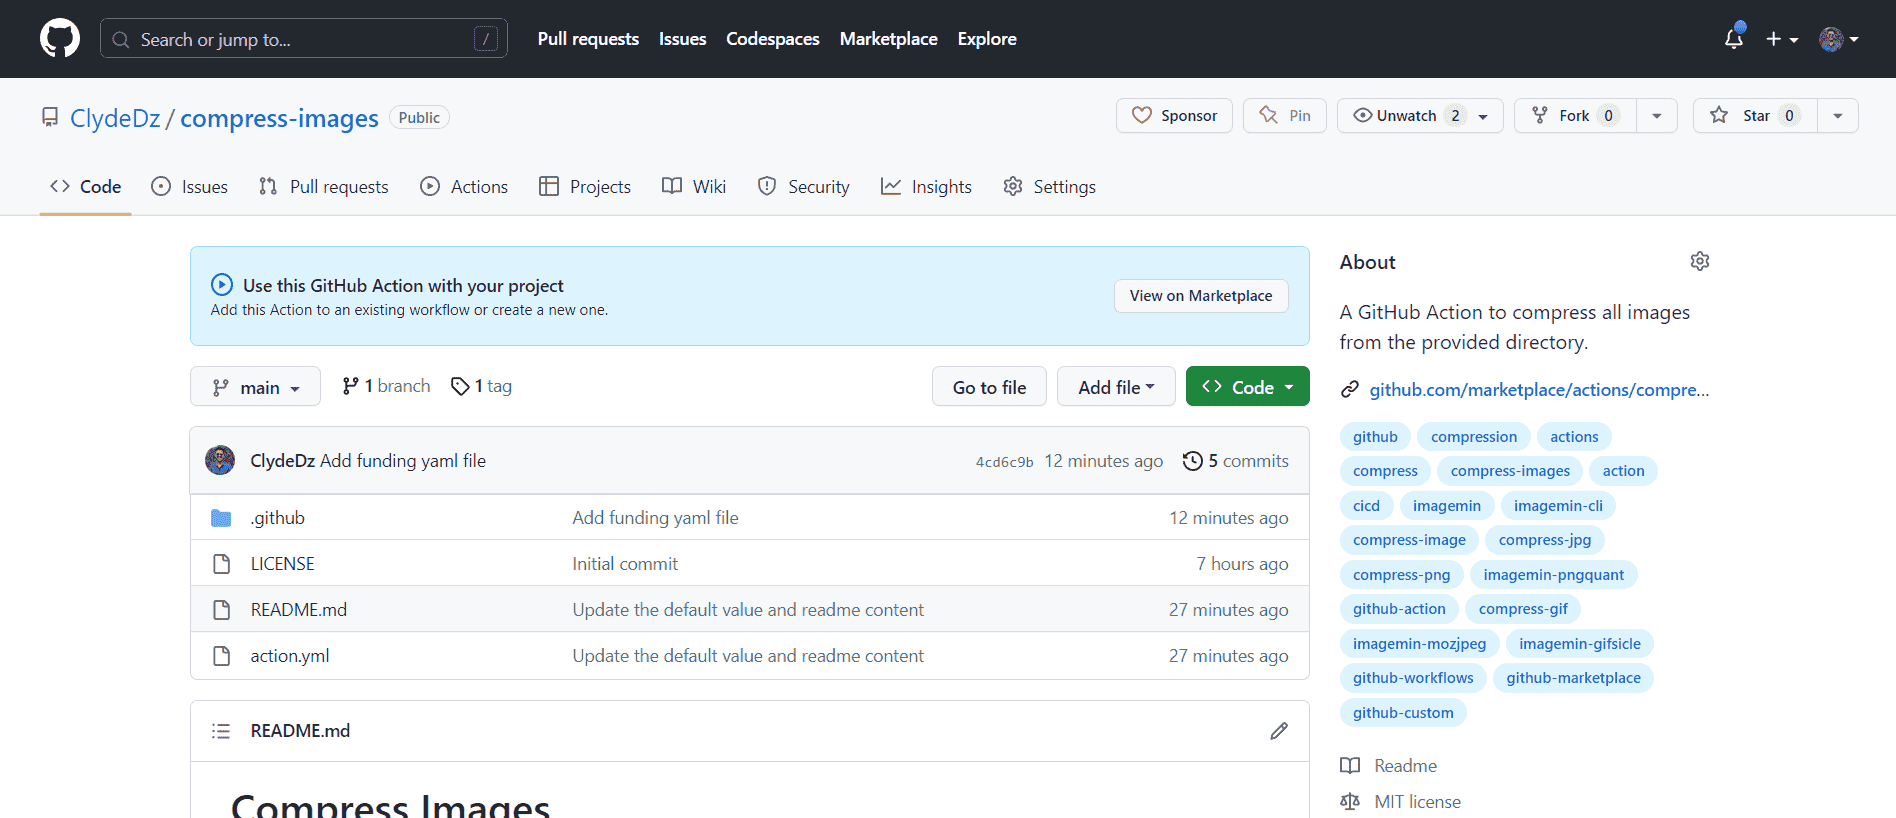
Image courtesy of the author
The code snippets shown in this article can be found in this GitHub repository. The published action can be found on the GitHub marketplace.
If you've followed along with this article and created and published your own action (composite or otherwise), please do share the links in the comments below and I'd love to check it out.
That's it! Thanks for reading.