- Published on ·
- Reading time 4 min read
What's Your Favorite Fruit? Cherries, I Hope
How I accidentally learned Git cherry-pick
Share this page
I'll admit, this isn't a feature I use on a frequent basis but when I do use this, it's such a life-saver. During one fine sprint, while working on a ticket, I branched out from the main branch and started to work on what was expected of it. The nature of the ticket involved adding some base files and included some refactoring before getting to the meaty bits of the actual implementation.
While pairing later, a different approach was discussed and the work implemented needed to be discarded. This isn't a problem because product is a team sport and engineering is collaborative in nature anyway.
This did mean, however, that I had to recreate the base changes at least in a different branch and then apply the implementation variation on top of it. Redoing those changes by hand is tedious and I didn't want to spend my time on that. That's when I found this context menu item called Cherry-pick commit in my Git client (I use Fork and would totally recommend it).
I read about cherry-picking and gave it a go — voilà! That's how easy it was to redo all those base changes. Cherry-pick to the rescue!
So, what is cherry-picking in Git?
Cherry-picking is picking arbitrary commits from a branch and applying it to another. Think of yourself as a surgeon delicately picking out commits or a commit from a branch and placing it into another.
A cherry-picked commit will always have a new SHA1 commit ID and not the same one from the original branch. This is because a cherry-pick operation doesn't copy the commit as-is but instead it applies the commit to the current branch after doing a diff.
Using a Git client
I'm going to use Fork for demonstration but this should be available on other Git clients, too.
First, I've added six commits to the main branch, each checking in a single markdown file named alphabetically. I then created a new branch and added three more commits continuing the alphabetical order. As pictured below, this results in files A to F created in the main branch, and additional files G to I created in the demo branch.
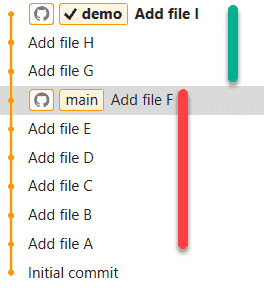
Image courtesy of the author
I then switch back to the main branch, and then from the Fork GUI, I cherry-pick the commit from the demo branch which adds the file named H. I do this by right-clicking the particular commit and then clicking on Cherry-pick Commit from the context menu.
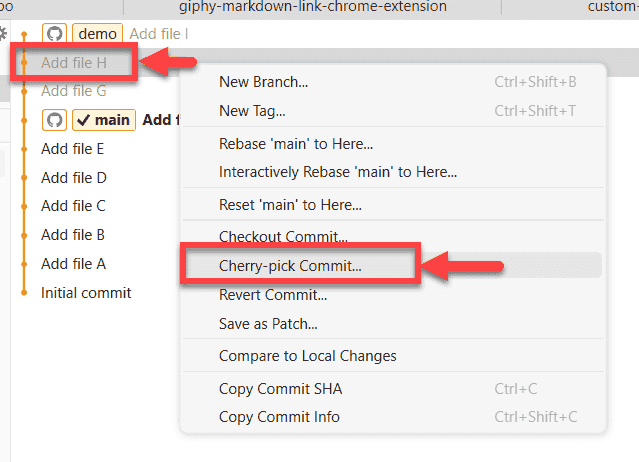
Image courtesy of the author
I get a prompt confirming if I want to commit the changes directly or not, and then if I click on the Cherry Pick button, the operation is completed.
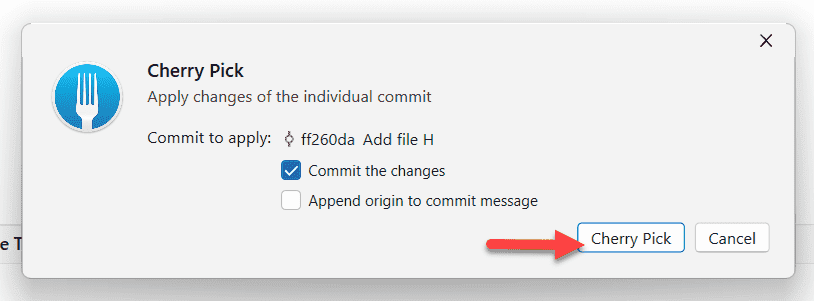
Image courtesy of the author
This results in just the file named H being added to the main branch. This, thus, demonstrates cherry-picking using a Git client.
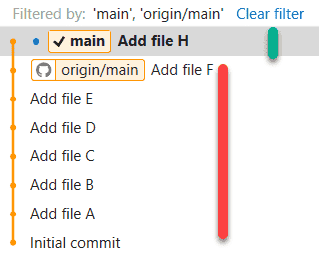
Image courtesy of the author
Command line
For the CLI folks, git cherry-pick is the command you're looking for. To apply a specific commit to the current branch, you'll use git cherry-pick <commit-id>.
To apply multiple commits to the current branch, you'll use git cherry-pick <commit-id-1> <commit-id-2>, which is quite similar to the previous one.
And on similar lines, to cherry-pick a range of commits, you'll need two periods between the first and last commit in the range, something like git cherry-pick <commitA>..<commitB>.
And of course, if you need to cancel the cherry-pick operation, you'll use the command git cherry-pick --abort. This returns back to the pre-cherry-pick state.
Refer to this official Git page for CLI documentation.
That's it! Thanks for reading.