- Published on ·
- Reading time 7 min read
Reducing a Visual Studio Extension (VSIX) File Size
And resolving a malformed Azure DevOps Extension package error
Share this page

Introduction
I was recently updating my Azure DevOps Extension that I had published in the Visual Studio Marketplace. The last time I made an update to this extension was in 2019 but I already had everything in place including a DevOps pipeline, so I thought this should be easy. Well, almost. When I got to publishing the extension, I encountered an error. This article aims at unpacking the error and the solution applied to fix this.
Problem
I made my changes, all the unit tests passed and even the build pipeline generated a VSIX package — so far so good. However, when the release pipeline kicked in, it failed with the following error while trying to deploy the VSIX package to the Visual Studio Marketplace.

In case the screenshot above isn't very clear, the text version is as follows:
error: Extension package is malformed/corrupted 0 [ 'error: Extension package is malformed/corrupted', '' ]
[error]tfx failed with error: Error: The process 'C:\hostedtoolcache\windows\tfx\0.7.11\x64\tfx.cmd' failed with exit code 4294967295
A quick search on the issue redirected me to this comment on a GitHub issue. Although it was for a VS Code extension, the underlying issue seemed like there was a file size limit in place when a VSIX was published to the Marketplace. This comment on the developer community forum also confirms a file size limit, although a slightly different size value.
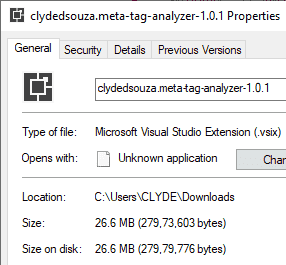
I had a look at the file size of the VSIX produced by build pipeline and lo and behold, it was 26.6MB! This meant that the first step to try and resolve this error was to decrease the file size of the VSIX package.
Solution
So, how do you go about reducing the VSIX file size? Let's take a look at this step-by-step.
Step 1: See what's being packed
Before we go about reducing the file size, it's important to understand what actually gets packed into a VSIX file. To unpack, simply download the generated VSIX file and unzip the contents like you would unzip a ZIP file.
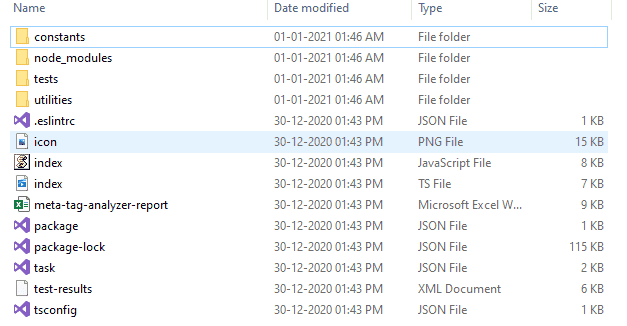
In the buildAndReleaseTask folder, I can see all my development files and the node_nodules folder. I don't see why this task will require the tests folder in the packed VSIX file, for example, to function accurately in Azure DevOps, so this needs to be investigated. From memory, I also know that the node_modules folder generally occupies a lot of disk space. A quick Google search will show multiple questions posted about a large node_modules folder and recommendations to reduce the size. This gives me a good starting point.
Step 2: Let's tackle the node_modules folder
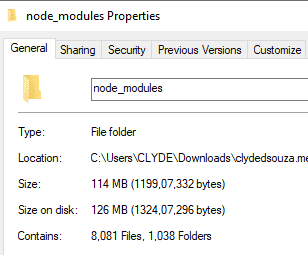
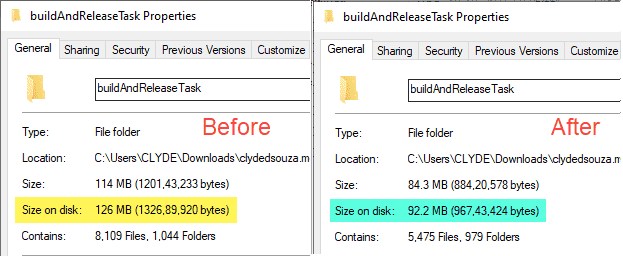
Before we do anything, if I check the size of the node_modules folder, it's a massive, 126MB on disk.
While researching how to reduce the file size of this massive folder, I stumbled upon this amazing blog post that described some approaches you can try. What caught my attention was the use of node-prune and modclean. I decided to try modclean since they provided their CLI tool via npm.
Following this CLI documentation, I did the following:
- I opened up the terminal window in VS Code and installed the CLI tool globally. I did this using
npm install -g modclean. - Still, in the terminal window, I changed the directory to
Src\buildAndReleaseTaskwhich is where thenode_modulesfolder existed and typed in the commandmodclean -r. This executes modclean on thenode_modulesfolder and specifying the-roption runs the utility without prompting any warnings or making this interactive.
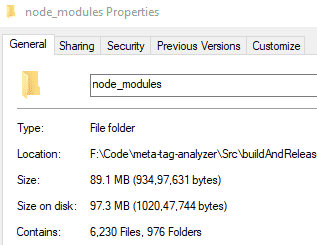
This reduced the node_modules folder size to 97.3MB on disk. Not too drastic, but that's okay for now.
I then ran the command npm run devtest to run my tests which includes executing the extension and generating an Excel report using an Azure Pipelines mock runner. All the unit tests passed and the final report generated accurately too. This gave me confidence that the task still works as expected even after shaving off some files from the node_modules folder.
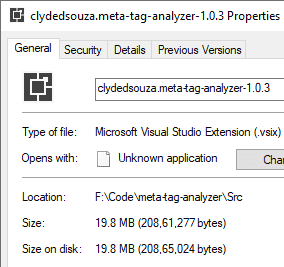
Finally, to check what would be the file size of the VSIX package, I ran the following command on my development machine. Check out the full documentation for tfs-cli here.
tfx extension create --manifest-globs .\vss-extension.json
The resultant VSIX package size was already a great improvement — down to 19.8MB from 26.6MB.
Step 3: Removing development files
When the task runs in the Azure Pipeline, it executes the run() method in the index.js file. The execution code block in the task.json file tells the pipeline to do so. This means, that we don't really require the TypeScript files in the final package.
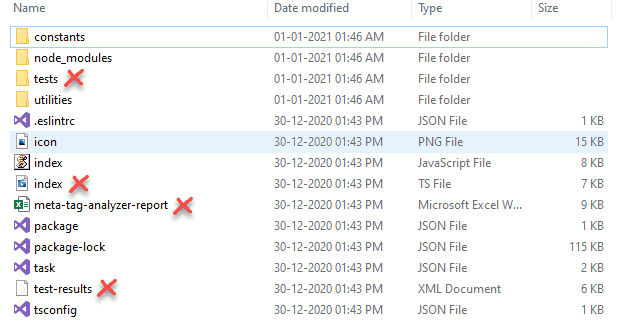
To remove all TypeScript files, I open up the buildAndReleaseTask folder where I had unzipped the contents of the VSIX package, I open up a command prompt, and I execute the command del /S *.ts (on Windows) to recursively delete all TypeScript files.
Similarly, I execute the command del /S *.xlsx to recursively delete all Excel files and the command del /S *.xml to recursively delete all XML files. I also use the command rmdir /S “tests” /q to delete the contents of the tests folder as we no longer require that. The option /q executes this command silently.
After this exercise, the size of the unzipped buildAndReleaseTask folder was reduced by 26.82%.
Step 4: Testing this in Azure DevOps
It's time to now test these steps in the Azure DevOps build pipeline which generates the VSIX package for me. Right after the unit test results are published to the pipeline and just before the VSIX is packed, I've added three command-line tasks — to install the npm package modclean globally, to execute the modclean command, and lastly, the commands to delete development files.
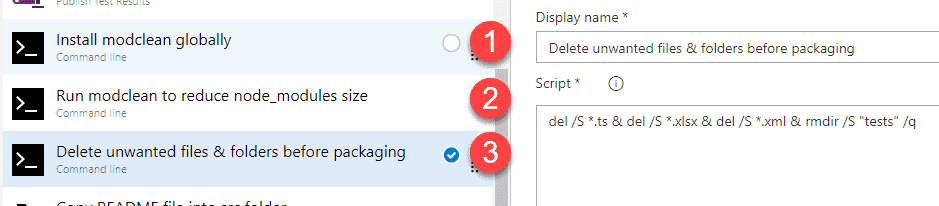
For the 'delete development files' step, I've combined all four commands into a single line by separating each command with an ampersand & operator.
I run the pipeline after saving my changes and compare the results. The VSIX packages' file size has been reduced by 8MB to just under 20MB. That's great!

Step 5: Housekeeping
Instead of writing all the commands directly into the build pipeline's GUI, let's move them into the scripts section of the package.json file.

I can now use the command npm run modclean and npm run clean-dir to execute these commands from the build pipeline.
Note: If you're using YAML for your pipeline, you might not require to perform this step as the entire pipeline is based off the YAML file and is source-controlled along with the rest of the code.
Conclusion
In the end, I ran the build pipeline on the main branch which built the package and this triggered the release pipeline which published the VSIX successfully.
If you'd like to check out the Azure DevOps extension, here is a link to Meta Tag Analyzer in the Visual Studio Marketplace. The source code for this extension is on GitHub.
Hope you've enjoyed the read. If you've gone through a similar journey, please let me know in the comments below.
That's it. Thanks for reading!